
Thank you for downloading savvy¬Ć, the design and control software for drive.web¬Ć process and drives systems controllers.
We offer free, weekly, on-line training seminars. Sessions are interactive with the presenter and take about one hour. Please email training@driveweb.com for an invitation.
Private, on-line training seminars are also available to address your particular application and expertise.
We also offer regular hands-on product training courses at our plant in Stevensville, Maryland. Please contact sales@driveweb.com for more information.
Let's get started
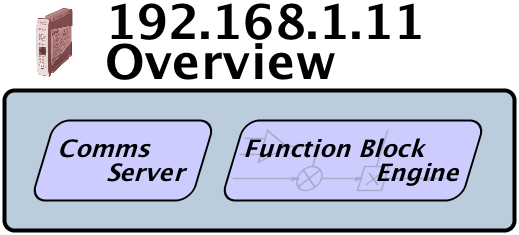
drive.web is internet-accessible distributed control technology for machine or process controls. The distributed control architecture ensures that it is scaleable and cost-effective for systems of any size or complexity.
drive.web provides robust connectivity between drives, remote I/O, PLCs, operator stations and SCADA systems using Ethernet.
drive.web devices incorporate available libraries of function blocks for a wide range of applications such as PIDs, winder and position controls, drive coordination, arithmetic, logic, etc.
savvy software enables you to design, document, configure, monitor and control either single drives or complex multi-drive systems. It runs on most OS platforms and can provide complete system access across the internet.
Running savvy for the first time
Upgrade to savvy-SFD and upgrade drive.web devices
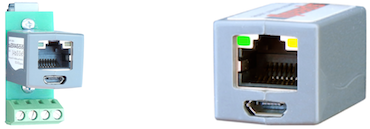
Plug and play USB
drive.web Ethernet introduction
savvy basics
savvy quick tips
Build a demo PID controller to learn the basic features of savvy:
Use Phantoms to design a system off-line
Add savvyPanel operator touch interface elements
Parameter Docks for quick access and trending
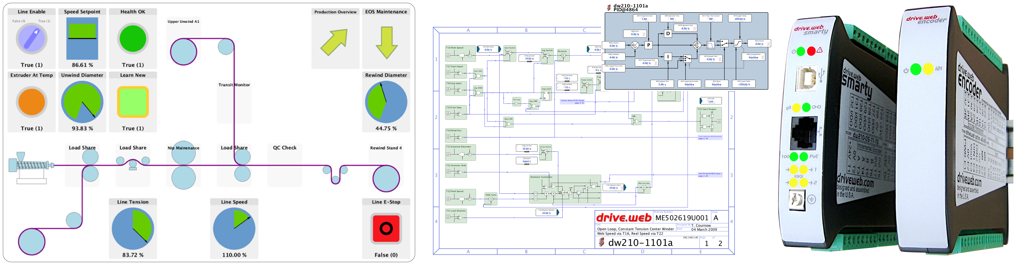
drive.web product lineup
Running savvy for the first time
savvy runs in "demo mode" at first and creates a system of Phantom devices.
Click any of the device icons to experience the Signal Flow Diagram.
Feel free to explore the demo, click and right-click objects, but remember to exit demo mode to get started.
- Under the File menu choose Demo mode and uncheck savvy-SFD phantoms only.
Select File > Open Device Directory to return to the Directory view. Now click any device again to see the standard Function Block Engine view in the free version of savvy.
Upgrade to savvy-SFD and upgrade drive.web devices
Upgrades may be purchased in a number of ways.
If your computer has internet access you can purchase upgrades with a credit card or with drive.web Vouchers.
- For savvy-SFD upgrade, find Upgrade savvy... under the Commerce menu. Check the box next to savvy-SFD and click OK.
To upgrade drive.web devices, right-click on the device icon and choose Upgrade Device.... Choose any of the available options and click OK.
- dwOption-04 ModbusTCP server. Robust industrial control over Ethernet from third-party controllers. See the page
dwOption-05 Process control library. Powerful function blocks, useful in most applications.
dwOption-06 Winder control library. Industry-leading, complete winder controls.
dwOption-10 Advanced math library. Includes Calculator function block with internal 32-bit floating-point accuracy.
dwOption-11 Encoder control library. Only available with encoder hardware options. Includes registration, electronic line-shaft, event counters and a large suite of 64-bit position blocks for linear and cyclic systems.
dwOption-25 EIP/PCCC server. The essential typed-read and write commands for Allen-Bradley controllers over Ethernet.
dwOption-26 savvyPanel. Unlock the full suite of savvyPanel tiles for touch operator stations.
dwOption-29 Solar. Precise, real-time sun position azimuth and zenith with latitude, longtitude, altitude and ‘îT inputs.
A Shopping Cart window will appear. At the lower right, next to Pay choose your payment method.
Two Vouchers are required for savvy-SFD upgrade. Enter each Voucher code on separate lines in the Voucher Code box.
- dwOption-04 ModbusTCP server. Robust industrial control over Ethernet from third-party controllers. See the page
If your computer does not have internet access you can purchase upgrades with a drive.web Coupon. Coupons are specific to your savvy installation or drive.web device.
- Each installation carries a unique identifier. Find the installation ID in the About drive.web savvy window which can be found under the Help menu. (For OS/X installations, find the About window under the drive.web savvy menu.)
A drive.web device's serial number is its MAC address. Right-click on the device icon and choose Get Info to find the MAC address. The serial number is also shown on a label on the outside of the device enclosure.
Note the savvy installation ID or device serial number and report it to your drive.web distributor with your coupon request.
Enter the drive.web Coupon in the upper box of the Coupon Manager, found under the Commerce menu.
Click Add and the Coupon is recognized in the lower box. Click Apply.
Verify that the savvy-SFD upgrade is complete by checking that the savvy-SFD choice in Upgrade savvy under the Commerce menu is checked and "greyed-out".
Find the active options in a drive.web device. Right-click on the device icon and choose Get Detailed Info
Plug-and-play USB
USB is the quickest way to access a drive.web device and network of drive.web devices that share the same Ethernet subnetwork.
Under the Directory menu, choose Discover via USB >
- Local Device to discover just the USB-connected device.
By IP Address... to discover a single drive.web device that shares the same subnetwork as the USB-connected drive.web device.
Network to discover all drive.web devices that share the same subnetwork as the USB-connected drive.web device.
Some functions are not supported via USB:
- Requires drive.web device firmware version 0x201A or newer. Please see Device Contextual Menu section of the user guide for more information.
Auto-discovery is not supported.
drive.web device IP addresses can not be changed via USB.
Windows 7 and OS/X support plug and play USB but contact us BEFORE connecting a drive.web device to a USB port on a WindowsXP computer.
drive.web Ethernet introduction
Ethernet supports drive.web distributed control and configuration and monitoring with savvy software.
Ethernet is the most common portal to the internet and the world-wide web.
Ethernet networks that enable drive.web communications may also be shared by other important elements including computers, printers and other controllers.
Understand some basic Ethernet facts to ensure reliability and avoid interference with existing systems that may be sharing the network:
- The best way to ensure success is to work with with your company's IT department.
"IP Address" in this document refers to a 32-bit, internet protocol version 4 (IPv4) address.
IPv4 addresses are notated as four octets separated by dots. Each 8-bit octet may be any value from 0 to 255.
DHCP protocol is widely used and makes connecting new devices to an Ethernet network easy but it is not useful for a robust control system.
Assign a valid, static, unique IP address to each drive.web device.
Avoid duplicate IP addresses on a local area network
A valid IP address is typically within the subnetwork of all gateways, Ethernet switches and computing devices that will carry or process drive.web messages. In special cases drive.web messages may traverse gateways and the internet. Contact us for assistance with drive.web over the internet.
drive.web devices support advanced features that are outside of the scope of this document. See the savvy User Manual for details. Contact us for assistance with setting up SNTP network time server, SMTP mail server.
Discussion - subnetworks and subnet masks
Subnetworks help organize network traffic so that, in general, messages are only transferred within the same subnetwork. See the Wikipedia - Subnetwork Page for more information.
Subnet masks are applied to the most significant bits of a device's IP Address to effectively divide the address into two parts, the subnetwork prefix and the device address.
The prefix and subnet mask is often 24-bits meaning that the first 24 bits of the address of every device on the subnetwork must match and there are only 8-bits or 256 unique addresses to identify individual devices.
| IP Address | Subnet Mask Size | Subnet Mask Notation | Subnetwork Notation | Valid addresses start with: | Maximum number of devices: | |
|---|---|---|---|---|---|---|
| Example 1 | 192.168.1.10 | 24 bits | 255.255.255.0 | 192.168.1.0/24 | 192.168.1. | 256 |
| Example 2 | 192.168.1.10 | 16 bits | 255.255.0.0 | 192.168.0.0/16 | 192.168. | 65,536 |
The host computer can not communicate properly with drive.web devices unless they are in the same subnetwork.
drive.web devices support subnetworking but their subnet masks are generally left open with all zeros. Contact us for more information on applying subnet masks in drive.web devices.
Discussion - Local Area Network, LAN
A local area network is suitable for implementing drive.web distributed control systems. It is geographically limited, typically within one building. It is implemented with wired Ethernet and wi-fi wireless Ethernet.
drive.web devices use standard twisted-pair Ethernet to communicate at 10 or 100 million bit per second (Mbps) transfer rates. The terms 10BaseT and 100BaseTX are used to name these standards.
drive.web devices can be connected together in pairs with single cables but most typically via active Ethernet switches as part of larger networks.
A LAN may be connected to other networks via managed interface devices such as modems, gateways and firewalls.
Example 3- Choose valid, unique IP Addresses for a small, private Ethernet network
These links provide information on IP addressing for reference: RFC1918 Address Allocation for Private Internets, Wikipedia - IP Address Page
For most small, private networks requiring less than 65,000 unique addresses, use the IANA recommended 16-bit block 192.168.1.1 through 192.168.254.254.
Unless otherwise informed, plan to use the address space starting with 192.168.1.10. Assign this address to the host computer and then use subsequent addresses, 192.168.1.11 etc for the drive.web devices.
Follow these steps if no information on the network design is available from the IT department:
- Devices that are turned-off or in a sleep mode may cause problems when activated. Whenever possible, turn-on or activate all devices that may be connected to the network.
- Local area networks may have one or more DHCP server which automatically assigns IP addresses on request. Check the setup of DHCP servers. These are devices like dedicated firewalls, network servers and wireless routers. Avoid using addresses for drive.web devices that are within the ranges assigned by these DHCP servers.
- Use a command prompt or terminal window and the "ping" command as a final check to search the local network for other devices that may be using each chosen address:
- At a command line, type e.g. "ping 192.168.1.10".
- After several lines appear hold down the control key and press "c".
- The last response line should indicate the packet loss percentage. Any value other than 100% packet loss indicates that the IP address is being used. A different address must be found.
- Ping every address that will be used and ensure that the final response shows 100% packet loss.
Example 4 - Setting up a Windows 7 computer on a small private Ethernet network
The host computer may use DHCP to obtain its IP address automatically ONLY if there is a DHCP server on the LAN. If this is the case, stop after step 3 below and skip to the next section, back to savvy...
- Open the control panel and double-click the Network and Sharing Center icon.
- Click the Local Area Connection shortcut to see the status window -
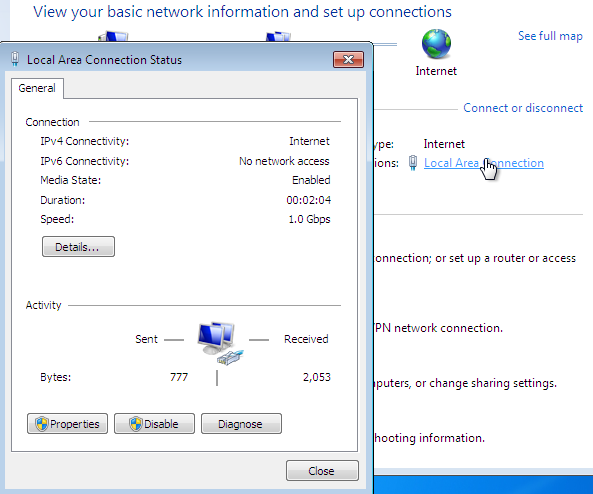
- Important! - Click the Details button and make a note of addresses for future reference. Note - This information may also be obtained by typing "ipconfig" at a command line. (That is the preferred method for WindowsXP.)
- IPv4 Address. This is the current address.
IPv4 Default Gateway and IPv4 DNS Servers. The computer uses this address to access the internet.
Determine the computer's subnetwork. If the addresses chosen in example 3, above, are not within this subnetwork then either:
- Repeat the steps in example 3 using addresses within the computer's subnetwork or
Multi-home the computer. Please refer to the First Time Network Administration page in the user manual for more complete information.
- Repeat the steps in example 3 using addresses within the computer's subnetwork or
- IPv4 Address. This is the current address.
- If the computer's IP address will not be changed, skip the following steps and go to the next section.
- Close the details window and click on the Properties button.

- Click on the text, "Internet Protocol Version 4 (TCP/IPv4)" and then click the Properties button -

- As shown above, click the radio button, Use the following IP Address and enter the chosen address for this computer in example 3. Proceed with caution! Changing the computer's IP address can interfere with internet access and other network devices!
- Set the subnet mask according to example 1 or 2.
- Enter the Default Gateway and DNS server addresses noted in paragraph 3, above.
- Special note - leave these addresses blank or set to 0.0.0.0 when there is no connection to the internet available.
- Click OK in all of the windows opened in this sequence to complete setting the computer up with static IP addressing.
Now back to savvy, set up the drive.web devices' IP addresses
- Note - savvy must be set to the Administrate capability to change IP Addresses. Please see the Access Control page of the user manual for more information.
- Under the File menu, choose Administrate > Set IP Addresses for System -
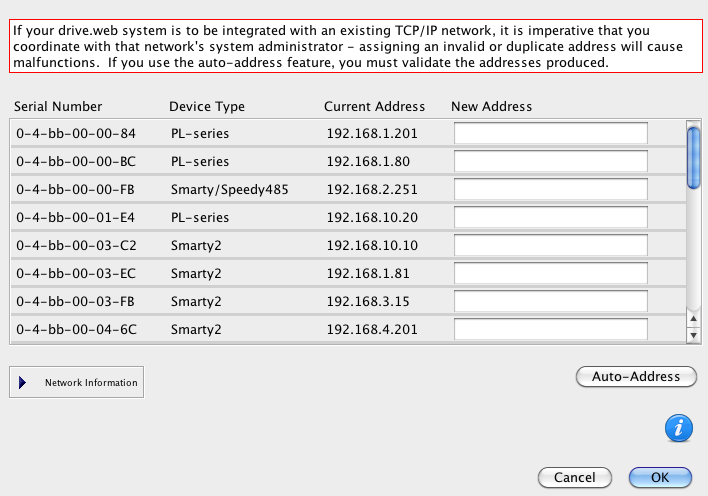
- Note - this function uses link-local multicast on special IP address 224.0.0.189 to discover devices on the LAN that may be outside of the computer's subnet mask.
- Locate the devices in the list by their serial numbers. Note - the device serial number is also its MAC address number.
- Enter the new IP addresses chosen in example 3.
- Leave the Network Information box closed. Contact us for information on using this area.
- Click OK and the devices will appear in the savvy device directory.
See the savvy Directory section in the savvy User Manual for more information.
savvy basics
drive.web architecture is device-oriented.
drive.web devices store and convey all the information in the signal flow diagrams, operator panel layouts, connection data and notes. Devices may be password-protected. No file is needed to access all of the information.
- Use Export Data under the Directory menu in the Device Directory window to save all the data and connections for one or many devices in the directory into one file on the host computer.
Right-click an individual device icon and choose Export Device Data to save the data from just that device.
Import data into device(s) to configure them according to a saved file in the host computer.
- Use Import Data under the Directory menu in the Directory view to put configuration and connection data into one or many devices in the directory from one file.
Right-click on an individual device icon and choose Import Device Data to put configuration and connection data into just that device.
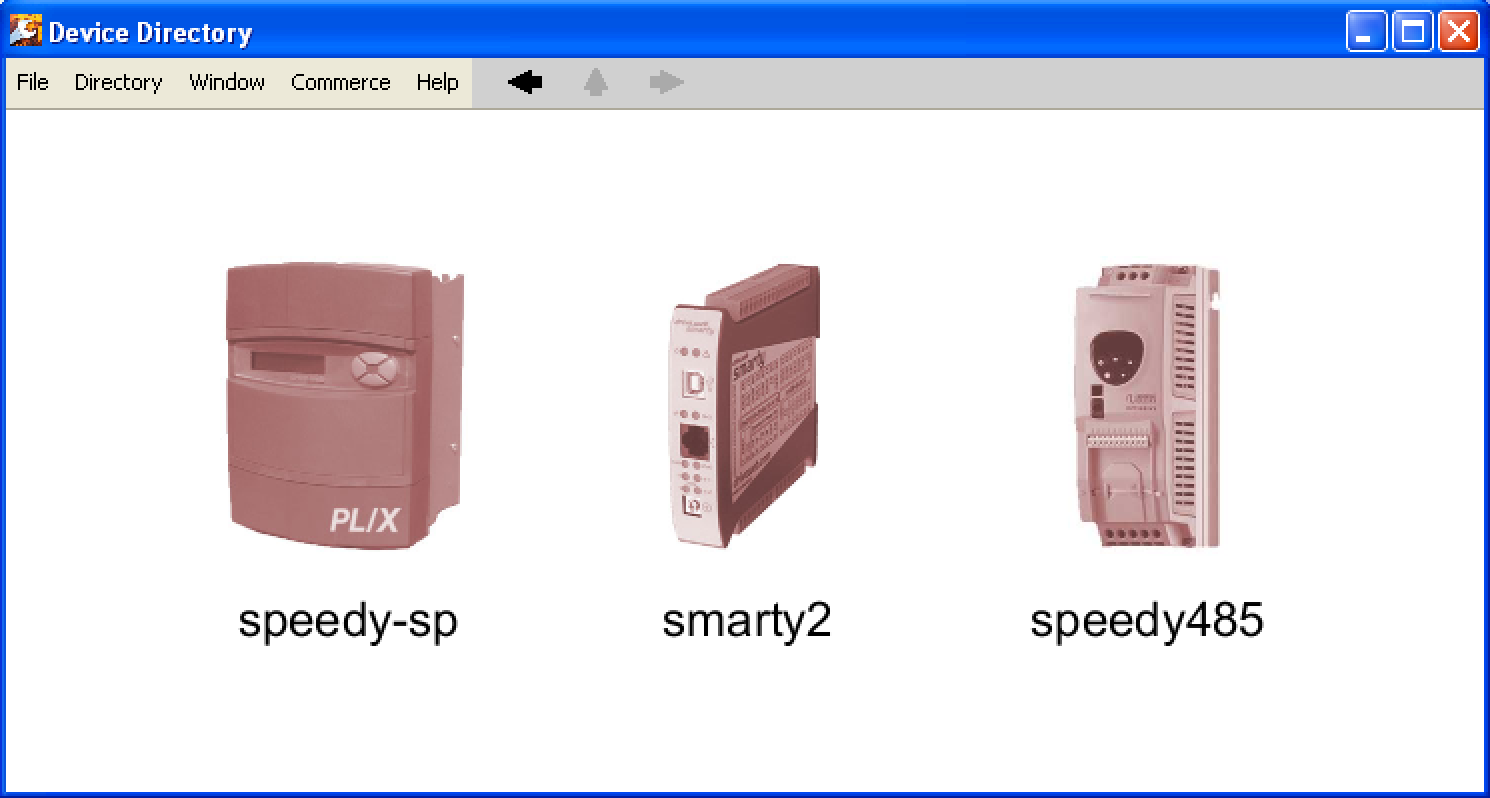
Phantom drives and devices are used to review, design or adjust device configurations without a live connection. Phantom configurations are imported and exported in the same way as live drives and devices. A Directory Menu choice creates phantoms according to a saved .dw-system file.
Discovering a stand-alone drive via its serial port
- From the Directory menu go to Discover on serial port and select the drive model.
- In the window that appears, click the Drive Setup Notes button to find required settings for that drive.
- When the drive is set up, ensure that the settings in the savvy window match the drive.
- The Graphic Data File is not used with standard savvy. With savvy-SFD assign a Graphic Data File or choose one that is saved on the host computer.
- Click OK and an image of the drive will appear in the Device Directory window depicting the actual frame size.
savvy quick tips
The savvy User Manual is easily accessible at all times from the Help menu.
All parameter values displayed are live except when working with Phantoms. All parameter values in Phantoms are saved with an Export.
All switch, relay and alarm states are active, live displays in the savvy graphics.
Hover the cursor over any Active Object. Its identity and pertinent data will appear in the status bar at the top of the window. A hover-button also appears -
Right-click or click the hover-button on any drive, device, function block, parameter or connection to open a Contextual Menu.
- Get Info.
Rename drives, devices, function blocks or parameters.
Rescale parameter's displayed scaling, format and units.
Change connection speeds between devices.
Start or end connections between parameters.
Add parameters to docks.
Delete items.
Copy parameters for pasting into a signal flow diagram, dock or savvyPanel system.
Upgrade or Load firmware into selected devices.
Click any drive, device or function block for more detailed view.
Click settable parameters for a parameter setter. See Parameter Setter in the user manual for more information.
Click blue connection arrows or rectangles to view the other end of the connection.
Click the left and right arrows in the Status Bar to browse backwards and forwards through the sequence of views.
Click the up arrow in the status bar to view the next higher level in the drive or system hierarchy for less details and more overview.
There are three easy ways to Zoom:
- Zoom at the screen center by holding "Alt" and "Control" and moving the cursor horizontally.
Zoom at the cursor by simply hitting "c" or "x" with "Alt" (fast) or "shift" (slow) modifiers.
Zoom in or out with your + or - keys.
Pan by holding down the "Alt" (Option) key and dragging the cursor. Alternatively use the keyboard arrow keys.
Hit the "h" key at any time to get the optimum "Home" view.
Parameter Docks are useful organizers that can be converted into powerful trend plotters with the Dock menu. See Setup a Parameter Dock below for more information.
Use Multiple savvy viewer windows to reduce repetive navigation, to drag-and-drop connections between separate function blocks or devices and to drag and drop parameters into savvyPanel. Under the File menu choose New Viewer... Depending on Preference settings it may be necessary to use the File menu again to select Open Device Directory, Open Dock File... etc
Make connections between parameters within a single device or between devices over Ethernet.
To make a new connection, use one of the following methods:
- Using a second viewer window, drag the source parameter on top of the destination parameter.
Right-click on the source parameter, select Connect to and select the destination from the list.
Right-click on the source parameter, select Start connection (Restart connection for subsequent connections). Navigate to the desination. Right-click and select Make connection from <source>.
Use Phantoms to design a system off-line
Example
Create a PID controller
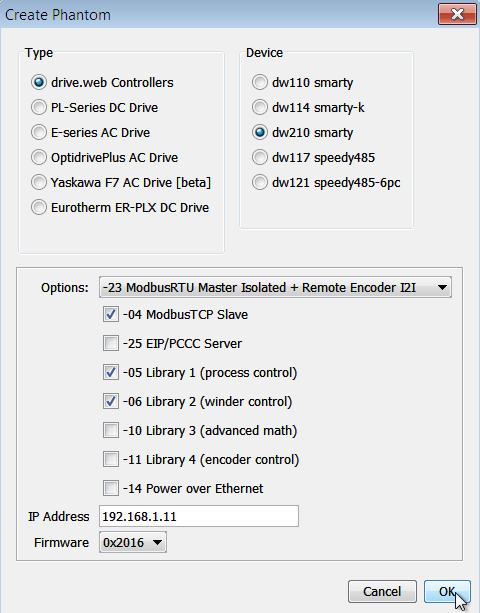
Create a new phantom device:
- From the Directory menu select Create Phantom Device ..., select drive.web Controllers and then select dw210 smarty¬Ć.
- Give the smarty lots of features by selecting:
- Option card -23 ModbusRTU Slave Isolated and Remote Encoder i2i
-04 ModbusTCP
-05 Library 1 (basic)
-06 Library 2 (winders)
Enter an IP address such as 192.168.1.11
Click the OK button
- Option card -23 ModbusRTU Slave Isolated and Remote Encoder i2i
- Give the smarty lots of features by selecting:
Building a control system with the free version of savvy versus savvy-SFD
| Free savvy | savvy-SFD | |
|---|---|---|
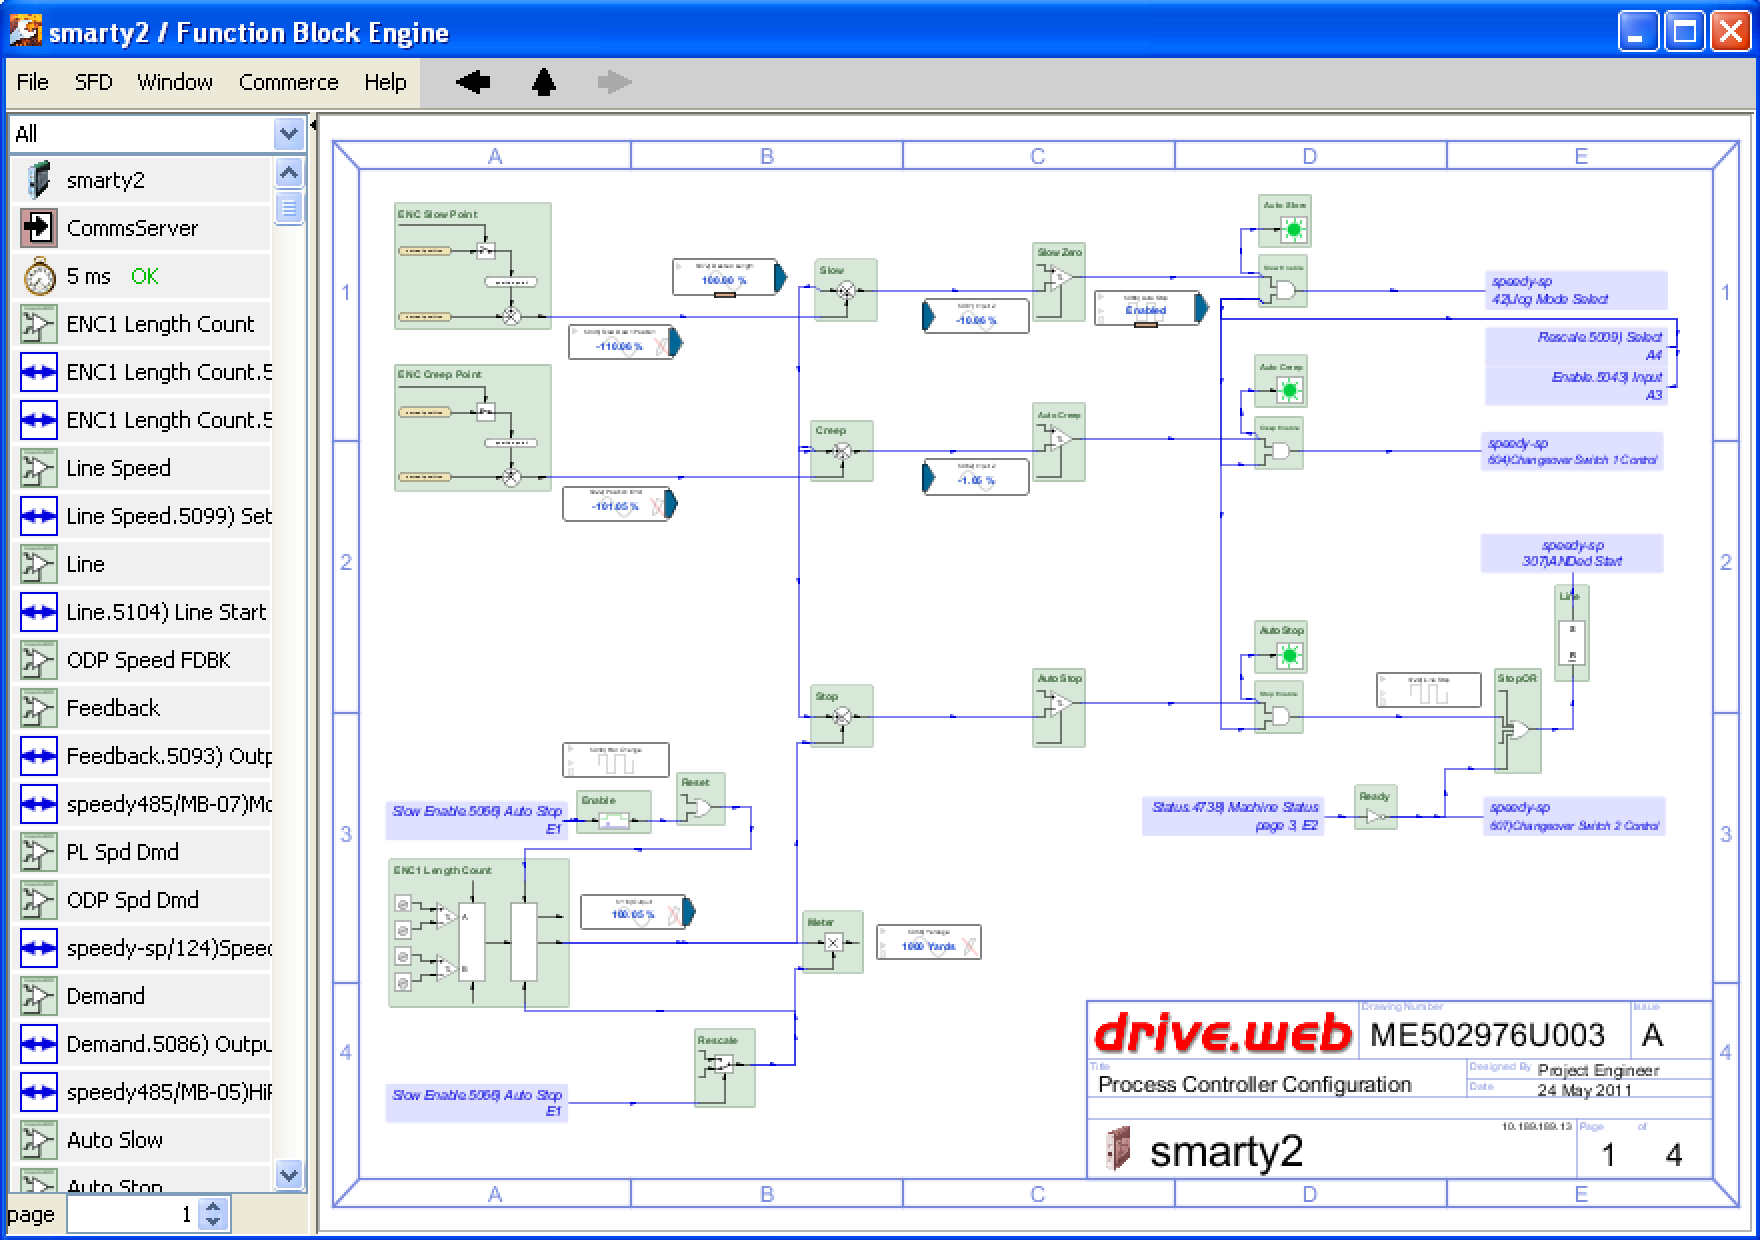
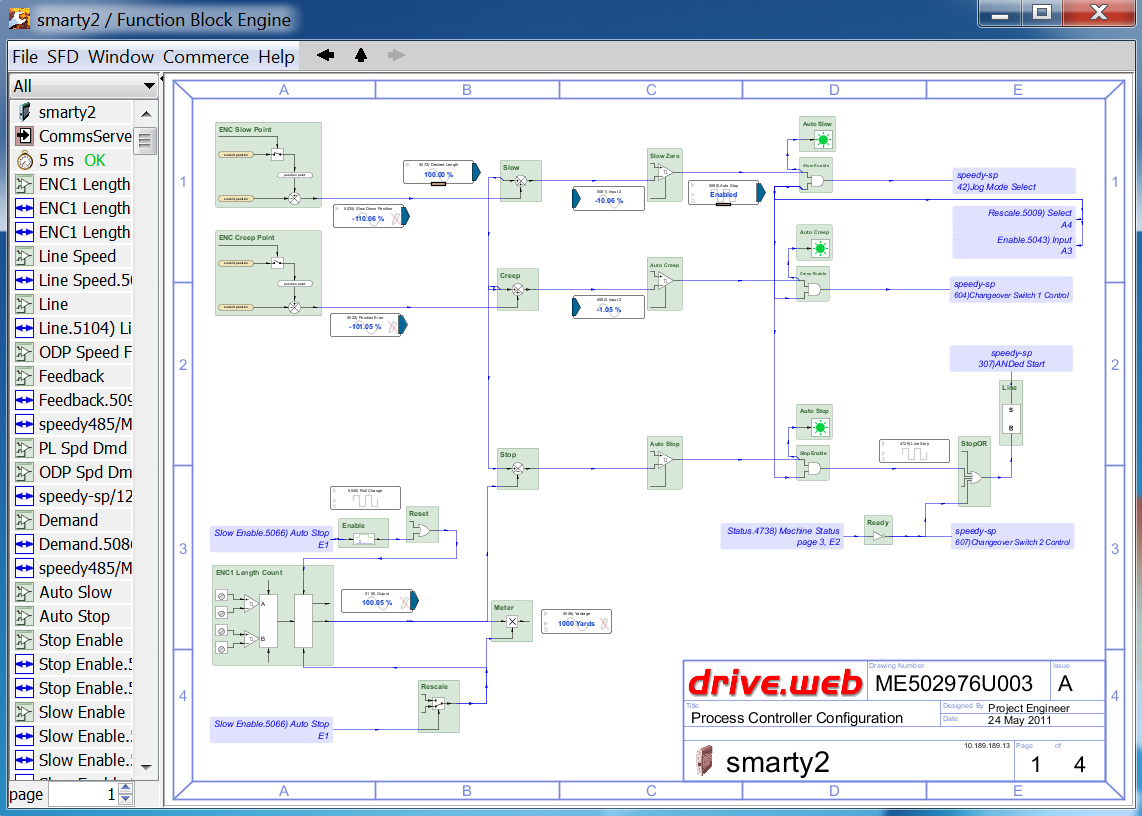
| 1. View device details. | Click the smarty icon to view the device overview screen. Click the Function Block Engine button.
 |
Click the smarty icon to view the Signal Flow Diagram.
Create an engineering drawing border. Under the SFD menu, choose Load Default Graphics.... |
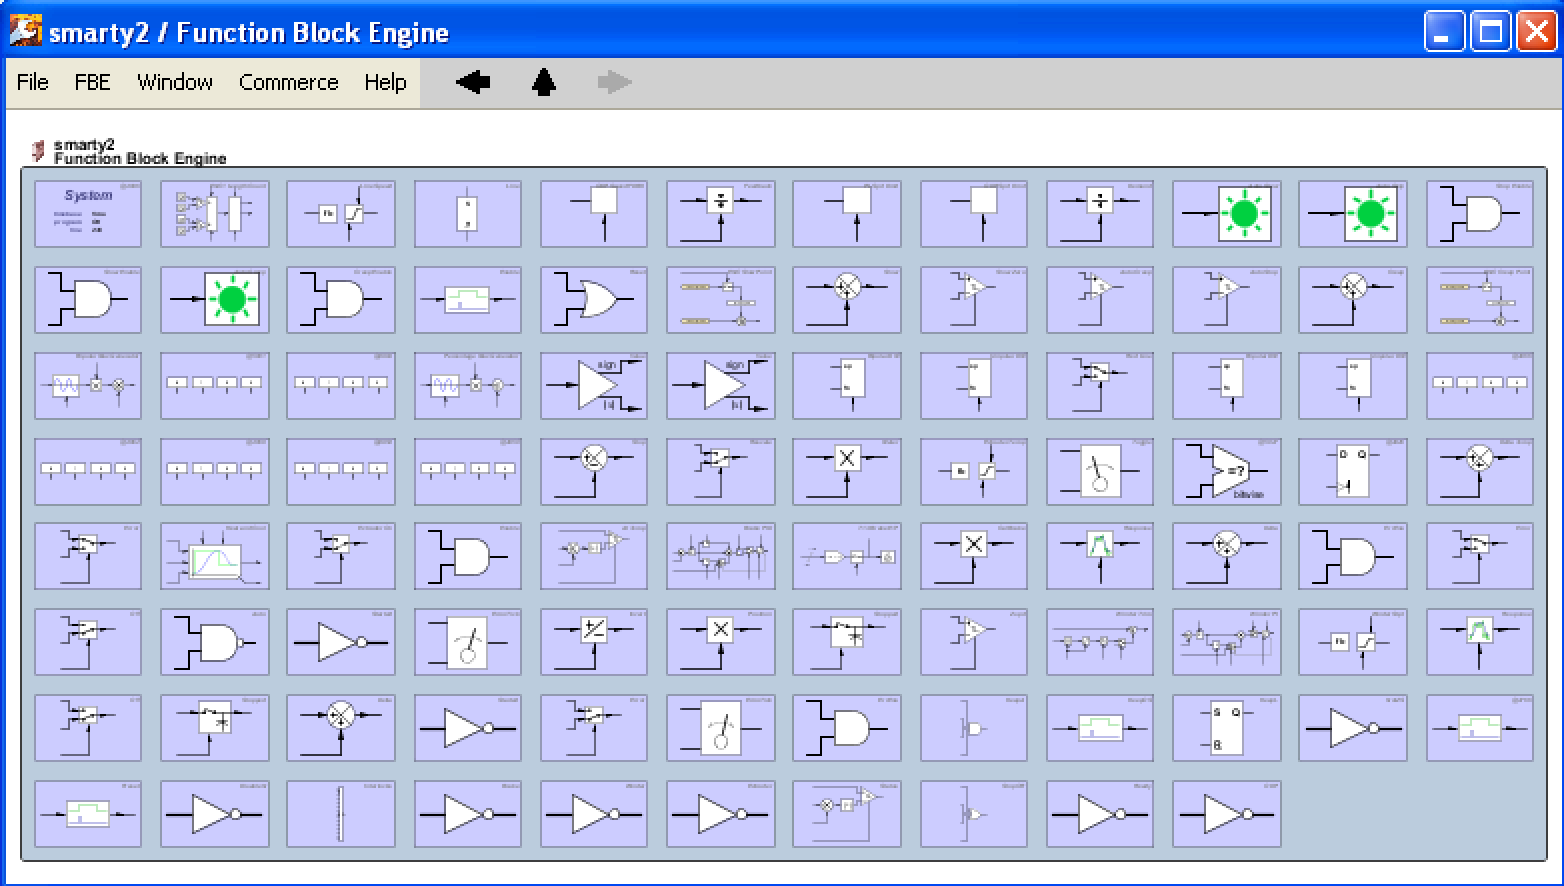
| 2. Instantiate function blocks. | Open the FBE menu and select I/O > T13 Analog Input. Repeat for:
Utility > Waveform Generator Control > PID I/O > T14 Analog Output |
Right-click in an empty area of the new drawing and select I/O (1) > T13 Analog Input. Repeat for:
Utility > Waveform Generator Control > PID I/O (1) > T14 Analog Output |
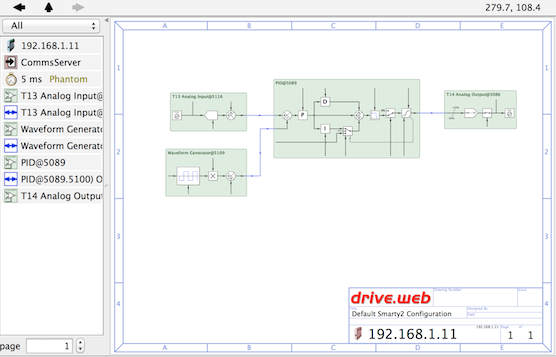
| 3. Overview | Press the "h" key on your keyboard to home the view and see all the function blocks.
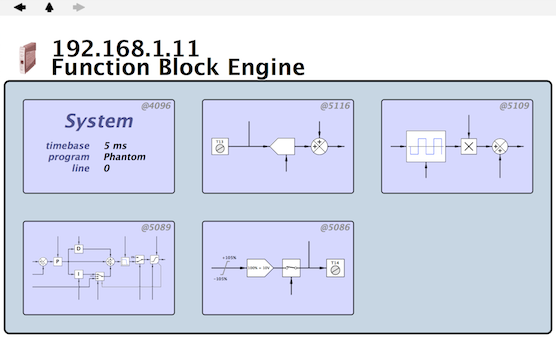 |
Click and drag function blocks around for clarity of signal flow. Generally, signals flow from left to right in function blocks. The analog input and waveform will feed into the left side of the PID. The analog output will be driven by the PID output.
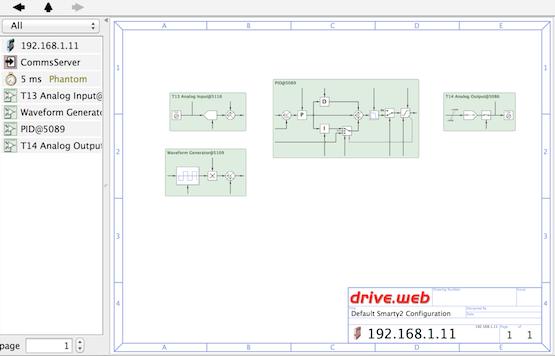 |
| 3. Make connections. | Click on T13 Analog Input.
Open a new viewer window. Under the File menu choose New Viewer... Depending on Preference settings, you may need to use the File menu again to select Open Device Directory In the second window, navigate to the smarty's PID function block details. Connect the T13 Analog Input to the PID. In the T13 Analog Input window, place your cursor over the Output parameter, hold the left-click and drag over to the Setpoint parameter at the left of the PID window. 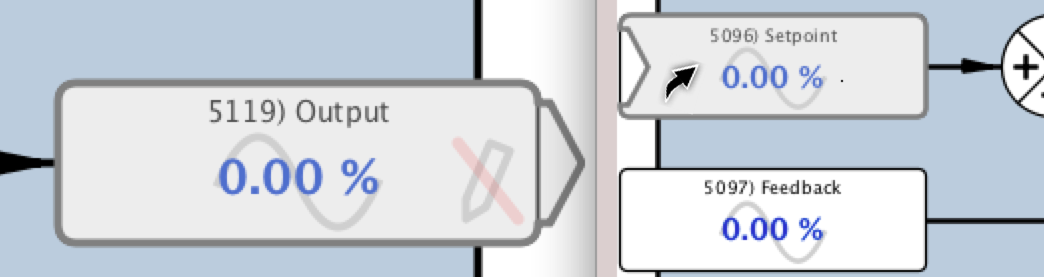 The blue arrows that appear in the parameter boxes indicate that a connection has been made. Repeat for connections: Waveform Generator Output > PID Feedback PID Output > T14 Analog Output Input |
In the SFD view, hover the cursor over T13 Analog Input while noting the information in the status bar at the top of the window.
At the middle of the right-hand side, a circle should appear and the status bar indicates, T13 Analog Input@5116.5119 Output. Click the circle and drag over to the left-hand side of the PID where another circle should appear, PID@5096.5097 Setpoint. Release the mouse button to make the connection. 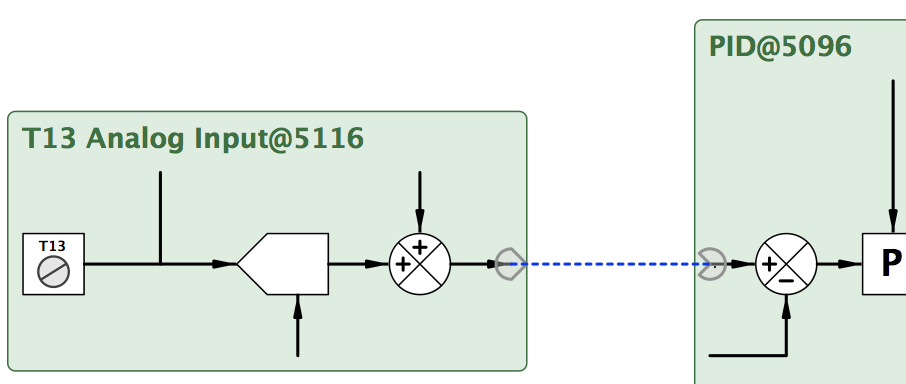 Repeat for connections: Waveform Generator Output > PID Feedback PID Output > T14 Analog Output Input |
| 5. Review | To see the new connections right-click on the savvy icon and select Show Connections 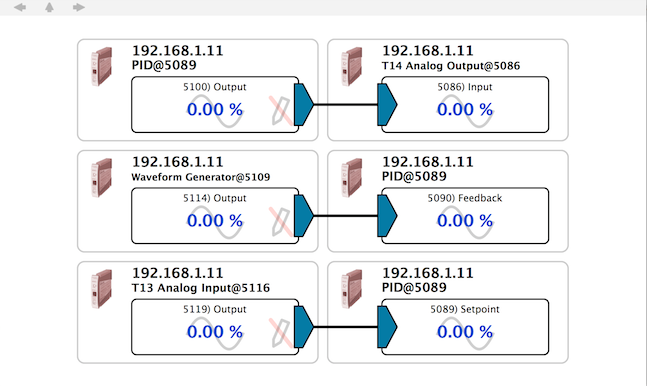 |
SFD view provides a good overview.
 |
Add savvyPanel¬Ć touch interface elements to the demo controller
In the next section we will go live with an actual smarty. savvyPanel will promote easiest control and monitoring of the essential parameters. savvy SFD upgrade is required to create savvyPanel tiles.
- Open savvyPanel in a new viewer window. Select File > New Viewer, then File > Open savvyPanel.
- There are two ways to create savvyPanel tiles.
- From a viewer window with SFD or function block view, drag and drop parameters over an empty area of the savvyPanel window and release.
In the SFD or function block view, right-click on a parameter and choose Copy Parameter. Now right-click in an empty area of the savvyPanel window and choose Paste Parameter.
- From a viewer window with SFD or function block view, drag and drop parameters over an empty area of the savvyPanel window and release.
- Both actions above will open a savvyPanel tile selector. Feel free to try the different tile choices. Remember drive.web devices must have dwOption-26 to display the full set of tiles.
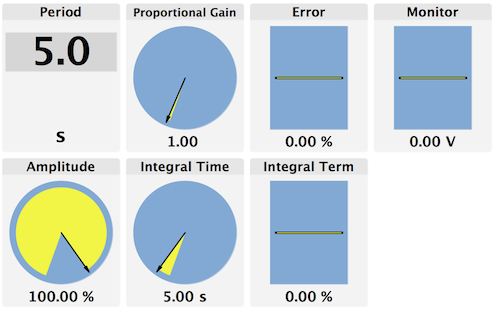
- Create tiles for the following parameters in the demo smarty: From Waveform Generator add Period and Amplitude.
From PID add Proportional Gain, Integral Time, Error and Integral Term.
From T14 Analog Output, add Monitor.
- Create tiles for the following parameters in the demo smarty: From Waveform Generator add Period and Amplitude.
Set up a Parameter Dock and take the PID controller live
Parameter docks must be saved in the host computer. They are not stored in the drive.web device. They are often used for convenience in troubleshooting and for gathering and displaying trend data for a given set of parameters.
To illustrate dock trend features use a live smarty.
- Export the configuration from the phantom to a file in the host computer. Right-click on the smarty icon and choose Export Device Data.
- Delete the phantom from the directory. Right-click on the smarty icon and choose Delete.
- Connect a smarty onto the host computer's subnetwork and discover it. Choose Discover Local Devices Now under the Directory menu.
- Right-click on any parameter in the smarty and choose Add to Parameter Dock. We are particularly interested in the dynamic signals at the Waveform Generator and after processing in the PID, but feel free to add as many parameters as you like to the dock.
- Add the parameters to a dock; Waveform Generator > Output and T14 Analog Output > Monitor
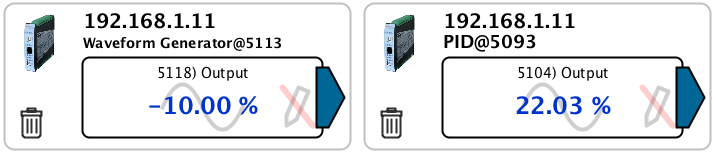
A PID controller acts to minimize the error between Setpoint and Feedback. The PID reacts strongly to reduce the error from the Feedback produced by the Waveform Generator if the Setpoint at smarty's T13 Analog Input remains at a constant value.
You may find the instant, graphic feedback from a dock to be a valuable learning tool for the complexities of the smarty's standard PID function block.
Start with a small and slow waveform. Using savvyPanel, set the Waveform Generator Period to 20 seconds and the Amplitude to 10%
Choose Show Trend under the Dock menu.
Choose Timespan > 1 minute under the Dock menu.
Right-click in the trend area to get a contextual menu including access to the instaneous Trend Point Info for the point in time that you right-clicked on. The color legend is also shown.
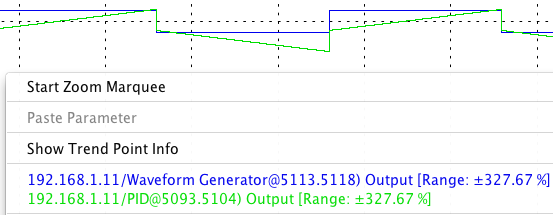
Dock trends give instant feedback to changing parameters. Try increasing the proportional gain in the PID.

In trend mode you can find various choices for exporting the data under the Dock menu.
Multiple dock windows are possible. Just open a new viewer window and add parameters to it. Always remember to save your docks for later use. Use Save as... under the File menu.
drive.web products
savvy software - always free, with monitoring, configuration, export and import, docks, built-in support for serial connection to PL-Series Digital DC drives and Optidrive Plus Sensorless Vector AC drives. View and change configuration files. View savvy-SFD configurations in phantoms. savvy is updated periodically. If your computer has internet access you are notified when updates are available.
savvy-SFD upgrade is recommended for developing systems and required for developing savvyPanel. With ready-made engineering drawings as you work and intuitive, clear and scalable graphics, savvy-SFD is right for all levels of experience and expertise. Upgrade is per user account and there are no maintenance fees.
savvyPanel securely puts the controls within your reach. The power of drive.web is easy to handle with clear, versatile graphics, smooth, easy setters, freely cross-linkable pages and many useful graphic components, meters, dials and switches.
- A limited set of tiles is available with all drive.web devices. Upgrade the drive.web smarty and speedy devices with dwOption-26, savvyPanel Upgrade, to see the complete set of tiles.
savvy-SFD upgrade is required for developing new savvyPanel systems.
Free drive.web savvy software or savvyPanel app for Apple¬Ć mobile digital devices; iPad¬Ć, iPhone¬Ć and iPod touch¬Ć is required for panel operators. There are no maintenance fees.

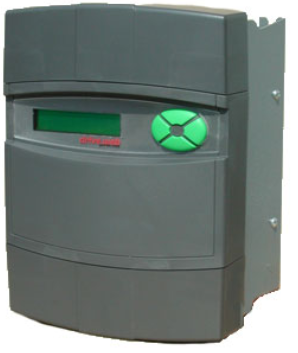
smarty - is a range of DIN rail mounted distributed control processors with a variety of hardware I/O options. smarty can work as a stand-alone programmable system controller or can be integrated into a distributed control system on an Ethernet LAN with drives, operator stations, PLCs and SCADA systems. Dedicated models are available with complete, high-performance interface to Optidrive P2, Optidrive Plus, Optidrive HVAC and Optidrive E2 also Yaskawa F7 AC vector drives.

speedy-sp¬Ć - is a range of drive.web processor boards that interface directly with the microbus of PL-Series digital DC drives. Provide Ethernet connectivity, ModbusTCP, ModbusRTU serial ports, function block libraries and more to PL-Series digital DC drives.
speedy - is a range of drive.web processors that interface with drives and other devices via a ModbusRTU serial port (The Optidrive-P2 interface is via CANbus). Dedicated speedy's for Optidrive P2, Optidrive Plus, Optidrive HVAC and Optidrive E2 also Yaskawa F7 AC vector drives. Generic speedy for any device with ModbusRTU server support.
drive.web savvy training courses
The drive.web technology and the savvy drive system design tools are very sophisticated and we strongly recommend that you attend one of our savvy training courses to get the most out of your systems. For more information, please contact info@driveweb.com or call (USA) 410-604-3400 for details.
Get savvy or download product manuals and latest firmware
Go to www.driveweb.com, click on "get savvy". Find links for product manuals and latest firmware at the bottom of the page.
Get more savvy
If you would like someone to go through a more detailed presentation of savvy, need further information or would like to attend a user training course please do not hesitate to call us at 410-604-3400. For more information, please visit: www.driveweb.com
savvy, smarty, speedy, savvyPanel and drive.web are trademarks of Bardac Corporation, registered in the U.S. and other countries.
Apple, iPad, iPhone and iPod touch are trademarks of Apple Inc., registered in the U.S. and other countries.