
Scope
This document is intended for drive.web users who are creating a standalone network for the first-time. More complex systems requiring Wide Area Network (WAN) connections (either plant-wide or via the Internet) will require specific network information from the appropriate administrator.
Overview
Although prior Ethernet networking experience is a plus, you do NOT have to be a networking expert to get your drive.web system up and running quickly. Generally, to set up a network, you will have to:
- Install the savvy software tools onto the computer you plan to use to administer the network (both Microsoft's Windows¬Ć and Mac OS X¬Ć operating systems are supported).
- Install the drive.web-ready hardware to be placed on the network.
- Connect the appropriate networking cables to electrically configure the network.
- Assign the appropriate Internet Protocol (IP) addresses to logically configure the network.
If unfamiliar with networking, review Ethernet and Internet Protocol Basics prior to proceeding.
Installing the savvy Software
The latest version of the savvy software tool is available on the worldwide web at http://www.driveweb.com. On the home page, click on get savvy:

If this is your first visit to driveweb.com, you will be prompted to enter some contact information. This information will only be used by Bardac Corporation to follow-up with customers and will NOT be distributed to any other organization.
Enter all your contact info (the * indicates required fields).
When complete, scroll down to Step 5 and click the get savvy button.

At this point, your browser will receive a HTTP cookie so you will not have to re-enter your contact information on any subsequent visits to the web site on the same computer. When the next page appears, click the get drive.web savvy link to download the tools.

Installing the drive.web-ready Hardware
While smarty modules are shipped ready-to-power and place on a network, speedy boards must be installed in the appropriate drive platform before configuring the network. The speedy-sp printed circuit board must be installed into a PL-Series DC Drive Version 5.12 (or later) while the speedy-se must be installed into an E-Series AC Drive Version 4.2 (or later).
Refer to the appropriate installation document for details.
Electrically Configuring the Network
With the drive.web-ready hardware installed, you are ready to configure your network. To build your network, you will require:
- A standard Category 5e cable (with 8P8C/RJ-45 connectors on both ends) for each drive.web-ready device and your computer.
- An Ethernet switch with sufficient ports to support all your drive.web-ready devices and the Administrator's computer.
Most Ethernet Network Interface Cards (NIC's) have both link and activity LED's to indicate network status. The smarty and speedy are no exception. The color codes are as follows:
| drive.web device | Link LED | Activity LED |
|---|---|---|
| dw11x smartys | Green | Amber |
| dw11x speedys | Green | Green |
The LINK LED indicates the network link is valid (i.e., OK) while the ACTIVITY LED indicates the local device has seen some Ethernet activity. If the ACTIVITY LED is flashing very quickly there are either drive.web connections to/from the associated device or it is currently discovered in the savvy tools Device Directory.
Connect a standard Cat-5e cable between each drive.web-ready device and the Ethernet switch. Finally, plug the Administrator's computer into the switch. Power-up the Ethernet switch, the drive.web-ready devices, and the computer. All the link LED's should go solid ON. If any link LED's are OFF, refer to the Troubleshooting section before attempting to logically configure your network.
Electrical Setup for Point to Point (PTP) Connection
A special case of a valid Ethernet network involves connecting only two devices: the Administrator's computer and the drive.web-ready device. If the computer's NIC does not support auto crossover detect, a single Cat-5e cross-over cable will be required to configure a valid network. If properly wired, the link LED on both the computer and the device still need to be on solid when connected.
Logically Configuring the Network
So, for our example, here is the network we want to build:
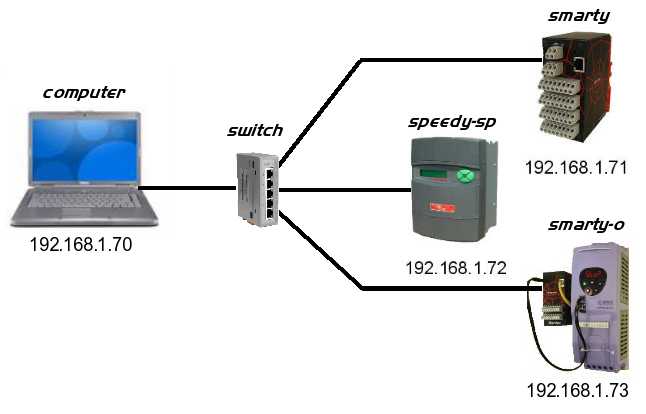
To logically configure this standalone network, a Class C private network with addresses in the range 192.168.1.1 through 192.168.1.254 will serve our purposes.
In addition to a range of IP addresses, you will need the serial numbers from each drive.web-ready product. The drive.web serial number is located on the sticker affixed to each device and has the format 00-04-bb-##-##-## where the last three octets (##) are hexadecimal numbers assigned by the factory (e.g., 00-04-bb-00-00-1a). Note, the drive.web serial number is the Ethernet MAC address.
Our example system has four devices as follows:
| Model Number | drive.web Serial No. | IP Address |
|---|---|---|
| computer | Don't Care | 192.168.1.70 |
| dw110 smarty | 00-04-bb-00-02-22 | 192.168.1.71 |
| dw111 smarty-sp | 00-04-bb-00-00-bc | 192.168.1.72 |
| dw113 smarty-o | 00-04-bb-00-01-9a | 192.168.1.73 |
Setting the IP Address On Your Computer
Generally, for ease of use, computers are configured to obtain an IP address dynamically from a DHCP server. In our desired network, there is no DHCP Server to assign an address to your computer and the default addresses will not likely be on our network (logically). Therefore, we need to assign a static IP address to the computer.
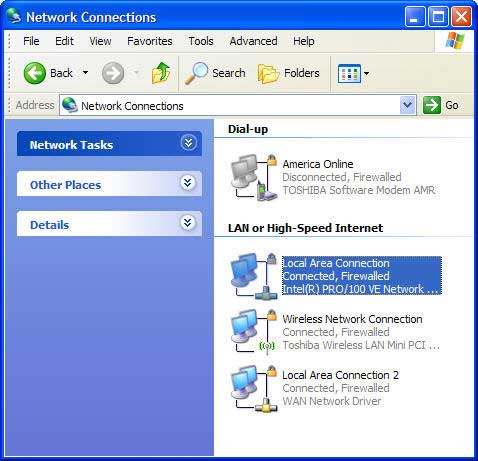
To set up your Windows XP computer, click Start menu and then select the Control Panel menu item. When the Control Panel folder opens, click on the Network Connections icon.
 |
 |
|---|
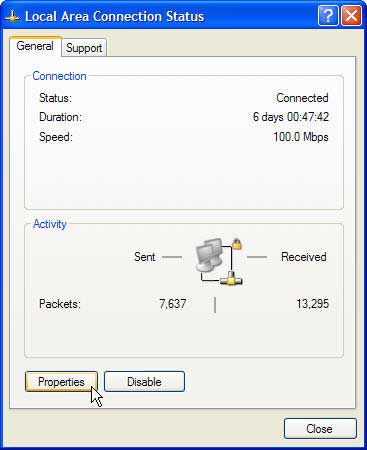
Click on the Local Area Connection icon, then the Properties button.
 |
 |
|---|
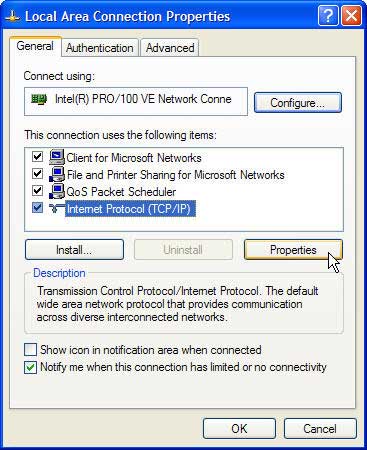
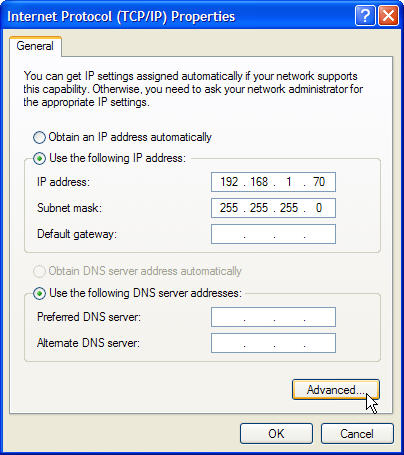
Then, select Internet Protocol (TCP/IP) item in the list. Click on the Properties button. Select the Use the following IP address: button, then set the IP address: and Subnet mask: to 192.168.1.70 and 255.255.255.0, respectively. Finally, click the OK button.
 |
 |
|---|
Required Firewalls Settings
Generally, today's operating systems include software firewalls. Although firewalls protect the user from malicious network activity, they also require a bit of manipulation to allow savvy's features to be exploited. When shipped, all drive.web devices ship with a default IP address of 10.189.189.189. This particular address was chosen to prevent duplication of IP addresses on most user networks when initially powered up.
Unfortunately, to ’Äúsee’Äů these drive.web devices when connected to your computer's Ethernet port, it will require you to do one of the following:
- Turn off your computer's software firewall (easiest!).
- Allow the UDP Port 48556 (and if a Windows XP computer, multihome your Network Interface Card).
Turning Off Your Computer's Software Firewall
The simplest method to enable all of savvy's features is to disable your firewall. If you are creating your own standalone network, disabling your firewall should not pose any security risks.
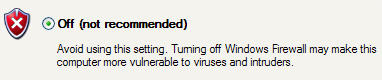
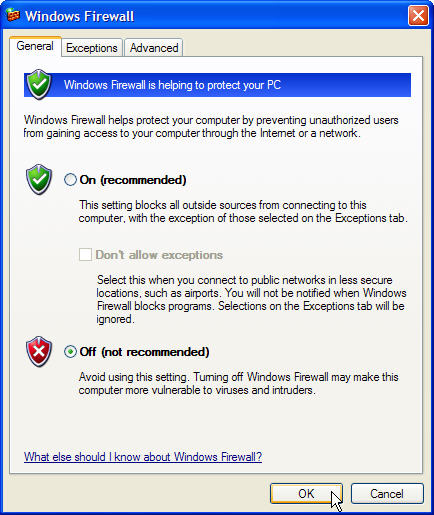
For Windows XP, from the Start menu, select Control Panel, and then click on the Windows Firewall icon. Under the General tab, click the Off selection button and then the OK button to disable the software firewall.
 |
 |
 |
|---|
Opening UDP Port 48556
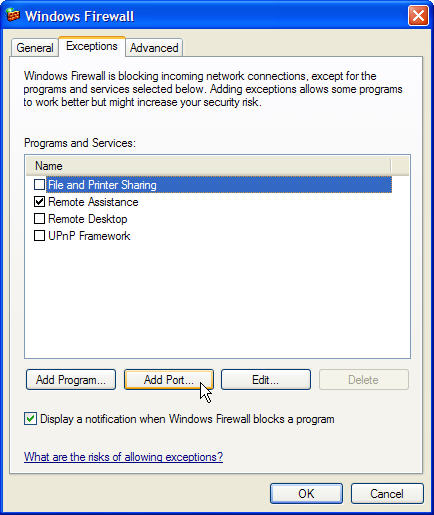
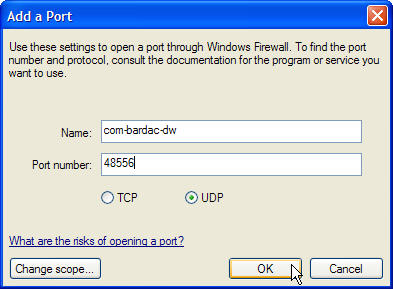
If you choose to leave your firewall ON, you will need to open UDP Port 48556 to support all the savvy tool's features. To open the port, from the Start menu, select Control Panel and then click the Windows Firewall icon. Under the Exception tab, click the Add Port... button. When prompted, use com-bardac-dw as the name and enter 48556 as the port number. Select the UDP button and then click the OK button.
|
 |
 |
|---|
Multihoming your Network Interface Card (also required for Windows XP SP2)
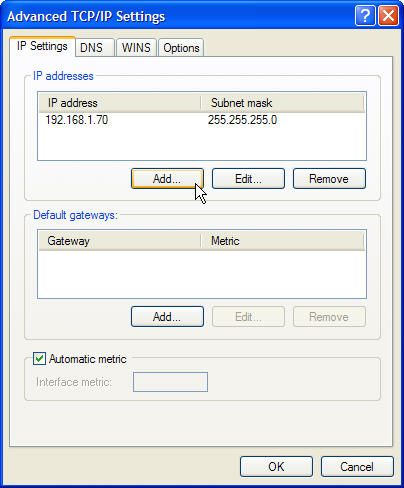
In most cases, opening Port 48556 will enable all of savvy's features; however, due to a limitation in the the Windows XP SP2 Firewall, opening the port will not completely enable savvy's capabilities. You can work around this limitation by assigning a second IP address to your NIC. Effectively, you computer will be a member of both the final desired network and the device's shipping address network. To multihome your NIC, click the Start menu and then select the Control Panel menu item. When the Control Panel folder opens, click on the Network Connections icon. Then, highlight Internet Protocol (TCP/IP) and click the Properties button. After the Internet Protocol (TCP/IP) Properties dialog box appears. Click on the Advanced... button. When the Advanced TCP/IP Settings dialog box appears, click the Add... button.
|
|
 |
|---|
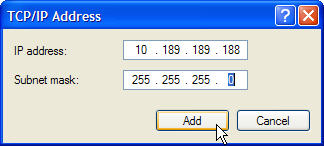
Your second IP address needs to be on the same subnet as the shipping address (10.189.189.189). When the TCP/IP Address data entry window appears, set the IP address to 10.189.189.188 with a subnet mask of 255.255.255.0, then click the Add button.
 |
 |
|---|
Launching the savvy Software Tools
With all the proper firewall and TCP/IP settings, launch the savvy application.
 |
 |
|---|
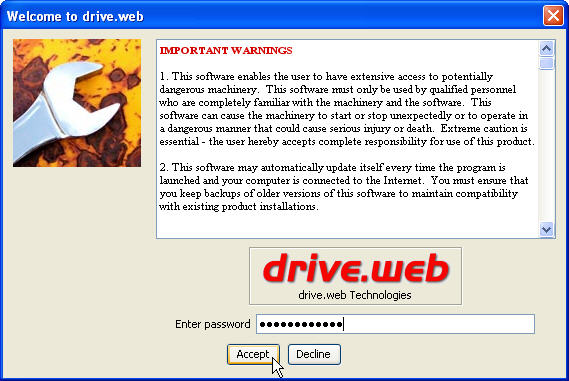
If this is your initial launch of the tools, the First Run dialog box (above left) will appear and you will be prompted to enter a password for each of the various Capability levels. Otherwise, the Welcome to drive.web dialog box (above right) will appear and you will be prompted for a password. Enter the Administrator password.
An empty Device Directory will appear:
Addressing Your drive.web-Ready Devices
You must have Administrate capabilities in order to set the drive.web-ready device IP addresses. If under the File menu, the capability is not Capability:Administrate, use the Set to Administrate item in the pull down Capability menu.
You will have to enter the password to change the savvy capabilities to Administrate (if set during initial installation).
Automatically Setting IP Addresses for Systems
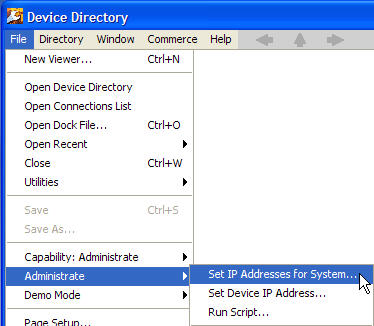
If the network is properly configured, savvy has the capability to discover all the drive.web devices on the network and either automatically assign IP addresses or allow the user to set all the desired IP addresses in one fell swoop. First, select Administrate in the File menu, then select the Set IP Addresses for System... menu item.
The Setup IP Addresses for System dialog box lists the drive.web serial number, device type, and current IP address.
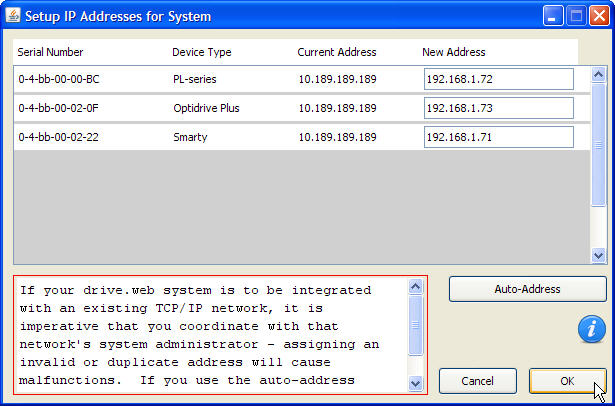
At this point, you have three choices on how to address your drive.web devices:
- Manually enter the desired IP address in the data entry box under the New Address heading (as shown above).
- Fill in the top address, then click the Auto-Address button. The IP addresses will be automatically incremented.
- Just click the Auto-Address button and the New Address fields will automatically be filled with a sequential IP addresses starting with the first address after your computer's IP address.
Duplicate IP addresses are a fundamental violation of the TCP/IP protocol and can cause message routing problems making the network inoperable. The savvy software will attempt to ensure there are no duplicate IP addresses prior to changing the IP address of any drive.web device. Ultimately, it is the responsibility of the user to ensure there are no duplicate IP addresses on the network.
Manually Setting Device IP Addresses
If you choose to manually assign each device's IP address, select the Set Device IP Address’Ķ in the Administrate menu.
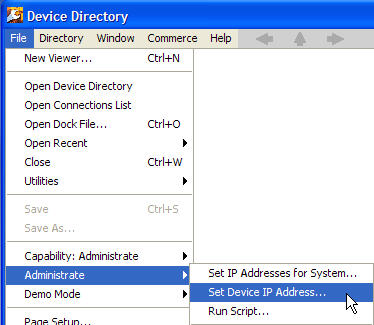
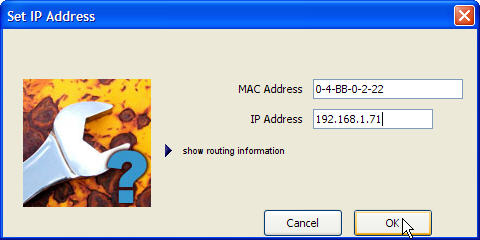
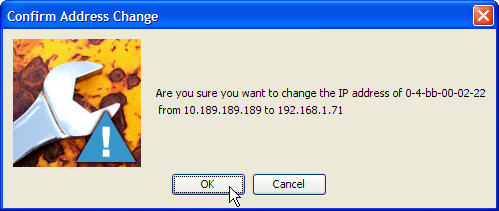
A Set IP Address dialog box will appear where the drive.web serial number and the desired IP address must be entered. When the dialog box appears, enter the appropriate serial number and IP address for the device (in this case a smarty). After clicking the OK button, a confirmation dialog box will appear prior to actually changing the IP address.
 |
 |
|---|
After the Confirm Address Change dialog box disappears, the IP address will be loaded and the drive.web-ready device will restart and be added to the Device Directory. Repeat this process for the speedy-sp and the smarty-o.
Final Device Directory
Regardless of whether you used the automatic or manual mode to set the IP addresses, the Device Directory should appear as follows:
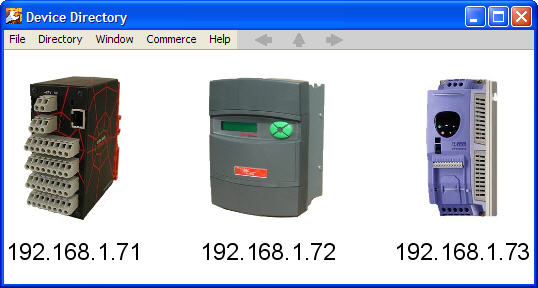
If your Device Directory does not appear as expected, refer to Troubleshooting to resolve your networking/configuration problems and then re-perform the appropriate steps.
Congratulations! You have successfully setup your first drive.web network.