
savvy and savvyPanel software are intuitively easy to work with. This guide highlights many of the tools that are commonly used.
This document describes full, Administrate Capability features. See the Access Control page for details.
The principle viewer windows and their menus
Zoom, Pan and Navigation tools
Multiple savvy viewer windows promote convenience and ease configuration
drive.web technology supports multiple users
Active objects, adornments and contextual menus
Exiting the software
The principle viewer windows and their menus
Find the status bar at the top of each viewer window. Browsing arrows and live contextual data is shown. Here, the mouse hovers over a device in the directory and its IP address, serial number (MAC ID) and group is shown. -

- See Zoom, Pan and Navigation, below for information on the browsing arrows.
A dedicated menu is available for many views.
All views include File, Window, Commerce and Help menus:
File menu
- New Viewer...
- Create a new, empty viewer window.
Open Device Directory etc.
- Switch to other principle views; Directory, savvyPanel, Connections, Dock.
Utilities
- Re-Map .. Files
- Use when device IP addresses need to be changed. Remap the original file and use it after the device IP addresses have been changed.
Kill Interface Lock...
- Release a drive.web device from the savvy or savvyPanel installation that is currently controlling it.
Show Comms Error Rates
- Current, total messages sent, messages lost and resulting percentage.
Hex Converter
- One-way, decimal to two's-complement, 64bit, hex number converter. Use when calculating 64-bit encoder position points manually.
Show savvyPanel Data
- Listing of all discovered savvyPanel systems, their device names and IP addresses and their tiles.
Clean Up savvyPanel Page Names
- Use in rare cases where all savvyPanel data and references to a savvyPanel page is deleted.
Save and Save As...
- Only used for docks. A .dw-dvg file is produced on the host computer for later use.
Capability:___
- Shows the current capability. Capability levels are discussed on the Access control page.
Administrate
- This submenu is only available with Administrate Capability.
Warning! It is essential that you read and understand the Ethernet section of the Getting started with savvy guide before changing any IP addresses!
- Set IP Addresses for System...
- Sends a link-local multicast and lists all local drive.web devices with their MAC addresses.
Set Device IP Address...
- Used for individual devices using the MAC address. Requires Ethernet connection.
Run Script...
- Currently only supports automation of setting device network information, IP Addresses etc. Please contact us for details.
- Set IP Addresses for System...
Set Password for View etc.
- Please see Capabilities on the Access control page
Page Setup, Print, Print Preview
- There are convenient printing features available in most views.
Export Image File...
- Produces a dialog window to create a .png file on the host computer.
Preferences
- Find application preference settings that are persistent through launch cycles. Preferences are discussed in this document where relevant. Find Preferences under the File menu or under the savvy application menu in Mac OSX installations.
Exit
- Exit and quit the application. Please see exiting the software section, below.
Window menu provides navigation controls for zooming and panning and displaying active windows and the savvy info window.
- See zoom and pan, below for more ways to zoom and pan.
Info Window
- Maintains a history of events that have called it since the software launched.
A timestamped selector is at the top of the Info window.
Info window displays outputs from several savvy utilities including:
- Get Info and Get Detailed Info for devices and parameters.
drive.web device user logs.
drive.web device program listings.
savvyPanel data listings
- Get Info and Get Detailed Info for devices and parameters.
- Maintains a history of events that have called it since the software launched.
Commerce menu promotes savvy-SFD uprade and drive.web device upgrades.
- Please see the upgrades paragraph on the Getting started with savvy guide for details.
Shopping Cart lists selected upgrades and provides three payment choices.
Coupon Manager is generally used where internet access is not available where the upgrade is applied. Coupons may be entered here and stored until they can be applied. See the page.
Help menu.
- Find savvy user manual, getting started guide, function block listings, contact information for drive.web support, bug reporting and links to the drive.web website.
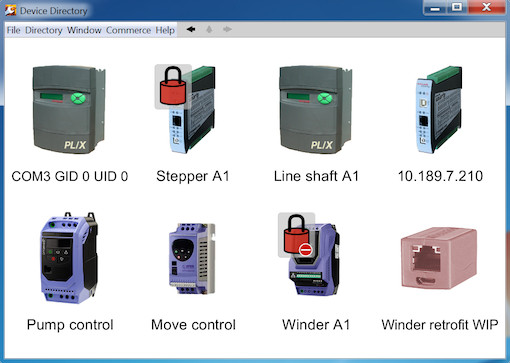
Directory view is shown on launch by default
The initial view can be chosen in the savvy Preferences.
The directory viewer displays a live, interactive icon for each of the discovered drive.web devices. See the active objects paragraph below for more information on device icons. Each device icon has its name underneath. If no name is assigned, the IP address or serial interface is shown.
There are several types of device icons that may populate the directory:
-

Phantom of any of the live device types below. Phantoms are rendered in low-color sepia. 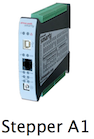
Ethernet and USB-discovered devices. The IP address and USB interface is shown when a device is un-named. 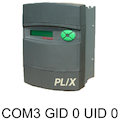
Serial-discovered devices. A name is shown instead of serial identification when device is named.
IP addresses can not be duplicated in the directory and should be avoided in any network. Phantom Ethernet and USB-connected devices occupy an IP address in the directory and will obscure a live device when present.
The directory is populated according to discovery settings, filters and requests found in the savvy Preferences and in the Directory menu.
Delete individual devices from the directory using the Device Contextual Menu. Note that Ethernet-connected devices will re-appear in the directory if automatic discovery is enabled.
Directory menu:
- Setup Discovery...
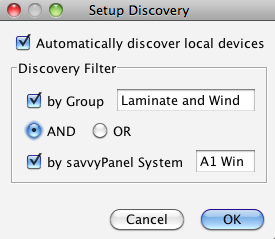
- Discovery of local devices is possible when they are link-local and on the same subnetwork as the host computer. See the Ethernet section of the Getting started with savvy guide.
Set group and savvyPanel system in individual devices using the Device Contextual Menu.
These settings are duplicated in the savvy Preferences.
Discover Local Devices Now
- Discover all drive.web devices that are on the host computer's Ethernet subnetwork. This menu choice is not available when automatic discovery is enabled in the setup dialog above.
Discover Device by IP Address...
- Enter the device's IP address or name if DNS service is available and the device has a DNS entry.
A drive.web device may be discovered anywhere on the internet by this method. Enter "smarty2.driveweb.com" to discover a smarty dw210 at our factory in Stevensville, Maryland.
Discover Devices from File
- Choose a .dw-discover file to discover a specific set of drive.web devices defined in that file. See Create Discovery File..., below.
Discover via USB
- Please see the Plug-and-play USB section of the Getting started with savvy guide.
Discover on Serial Port

- Requires serial port hardware in the host computer that is suitable for the target drive. A USB-to-serial port converter is commonly used.
The discovery dialog is tailored to the selected drive type. Ensure that the Comms Speed matches the drive's serial port setting.
PL-Series drives are addressed in a serial network via GID and UID. The default value is zero for both.
Click the Drive Setup Notes... button for a web page describing specific information for this drive type.
Unlike drive.web devices which store signal flow diagram graphics onboard for multi-user access, stand-alone drives require the host computer to store the graphics. Choose or create a new .dw-graphics file to store the signal flow diagram graphics.
Create Phantom Device...
- Choose device type, options, address and firmware version to create a new, empty phantom device.
Import Data and Create Phantoms...
- Select a .dw-system file to import new phantom devices into the directory that are configured according to the file.
Sort
- The array of devices in the directory is sorted from left to right and then top to bottom. Sort by none, name, IP address, MAC address or group.
Unlock and Lock Devices...
- Applies to all Ethernet and USB-connected devices with password set.
Set Password etc. for Devices
- The dialog allows devices to be individually deselected.
Please see drive.web Device Password and savvyPanel Access Control section of the Access Control help page.
Assign Groups to devices to aid sorting in the directory and filtering device discovery.
Export Data...
- Opens a selection dialog to create a single .dw-system file on the host computer that contains all configuration and connection information for selected devices in the directory.
Import Data...
- Opens a selection dialog and all configuration and connection information in all selected devices in the directory may be overwritten.
Clear All Device Logs
- Caution! There is no dialog. Clearing can not be undone.
Delete All Devices
- Empties the device directory. Devices may quickly re-appear if automatic discovery is enabled.
Create Discovery File...
- Opens a selection dialog to create a .dw-discover file on the host computer. Discovery files can be used for convenience to discover only particular drive.web device(s). A discovery file may be selected in the savvy Preferences.
- Discovery of local devices is possible when they are link-local and on the same subnetwork as the host computer. See the Ethernet section of the Getting started with savvy guide.
FBE view is only found in the free version of savvy
Click a device in the directory to view the Device Overview Screen. Click the FBE link at top-right for the FBE view.
Drives discovered on serial ports do not have access to a function block engine. Ethernet or USB discovery is required.
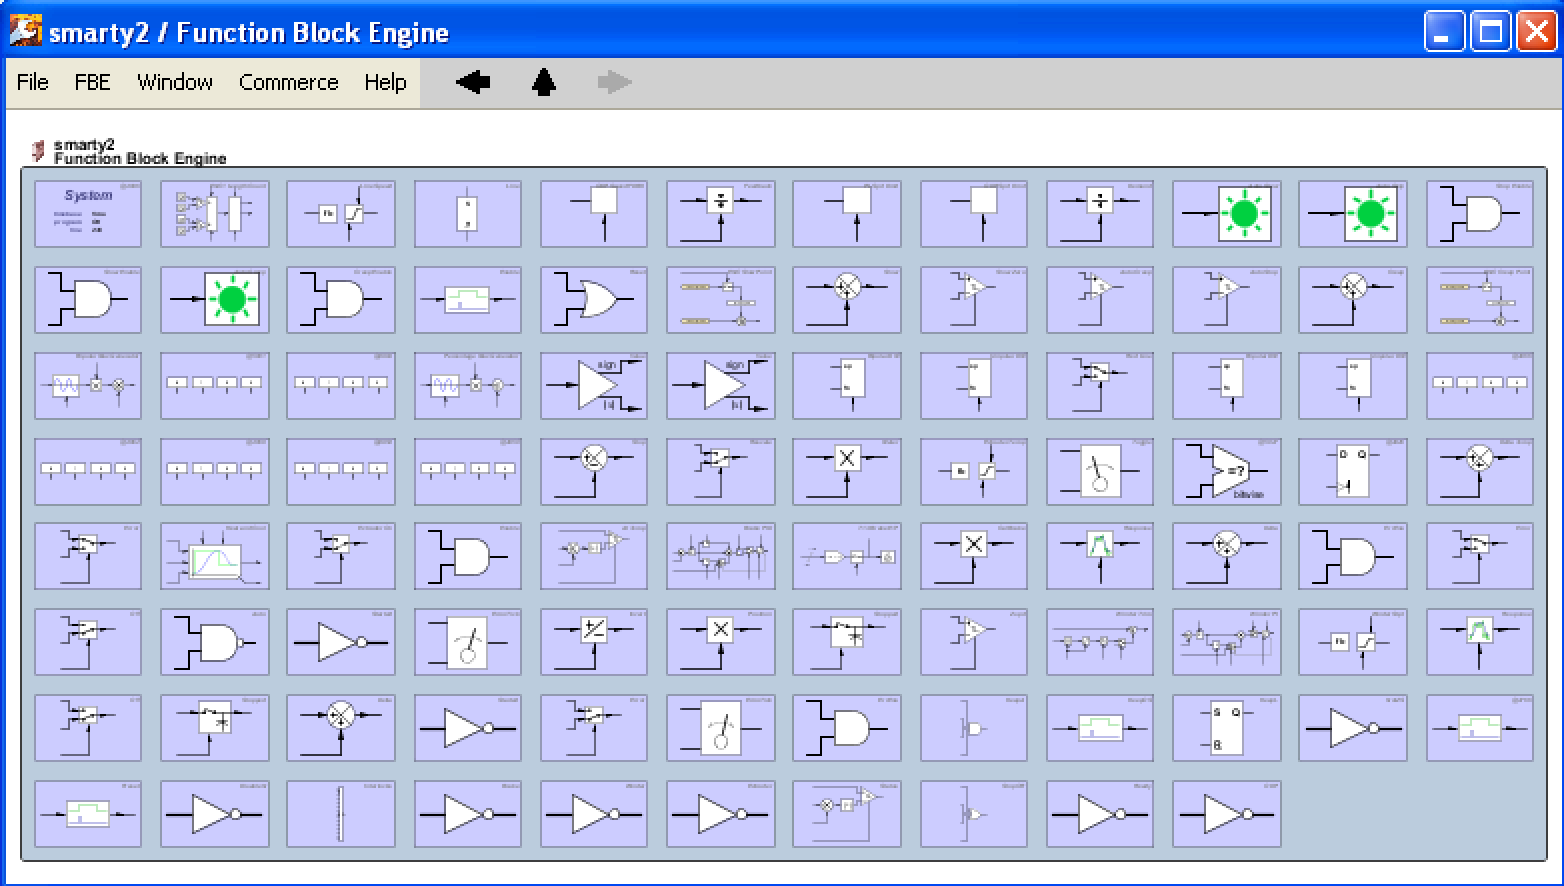
Function blocks are shown in the order that they are processed from left to right then top to bottom.
Click a function block for the Function Block View. View the internal structure, check or set parameter values and make connections.
Right-click any function block for the Function Block Contextual Menu.
Note the special System function block which is always in the first position, top-left.
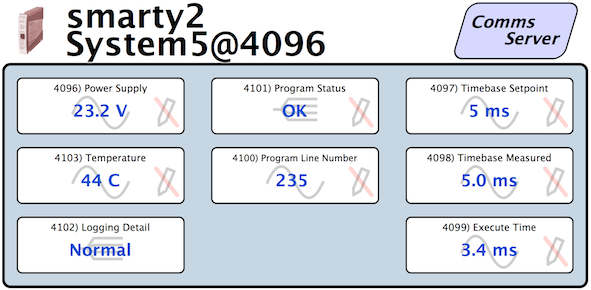
- Set Logging Detail to Debug to log unusual network or hardware problems.
Program Status should always be OK. It is possible to make a connection from this parameter to monitor and promote contingency systems.
Program Line Number refers to the program listing which can be viewed from the FBE (or SFD) menu. The program line indicated should be examined in the unusual case that the Program Status is not OK.
FBE menu:
- Set Timebase...
- The time in ms in which the entire function block engine completes one execution cycle.
See the System function block to view live execution time data and more.
The default timebase is 5ms for second generation drive.web devices, dw2xx.
Show Program...
- List with line numbers of function blocks and connections in the order that they are processed.
Clear...
- Caution! Please see the Clear Dialog section, below.
Add Function Block...
- Function blocks are executed in the order that they are added. It is important to plan the function block execution order before adding new function blocks with the free version of savvy.
Use this dialog in the unusual case that the function block's starting parameter address must be selected.
Arithmetic etc.
- Create a new instance of a function block directly.
Function blocks are organized by functional type.
Function block availability depends on the installed options.
- The time in ms in which the entire function block engine completes one execution cycle.
SFD view provides a live, interactive configuration overview
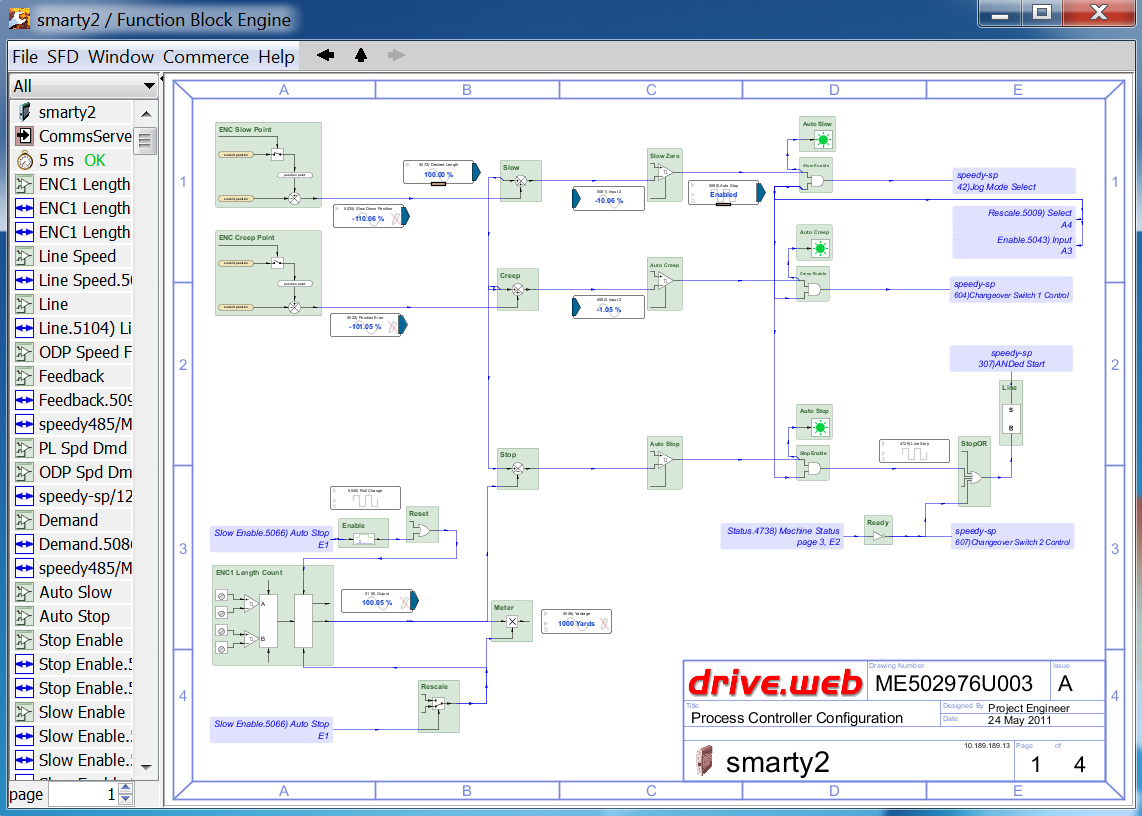
The SFD view has two main parts, the function block and connection listing and the signal flow diagram.
Function block and connection listing occupies the left side of the SFD view
The function block and connection listing includes the following types of active objects:
 |
List Item | Description | Hover for info in status bar | Click | Right-click |
|---|---|---|---|---|---|
| Device | Name, MAC ID or serial ID info, IP address, Group name. | See Device Overview view, below. | See Device Contextual menu, below. | ||
| Comms Servers Not present if there are no server options available. | See Comms Servers view, below. | ||||
| System function block Not present for serial-discovered devices. Provides status information and timebase setpoint. Status should always be OK. | Status and name | View power, temperature, execution time. Set logging detail level. See System function block. | Set Timebase The default timebase is 5ms for second generation drive.web devices, dw2xx | ||
| Function blocks that appear in the signal flow diagram are shown in full color. | Function block name | See Function Block view, below. | View function block manual page. Change function block name. See Function Block Contextual Menu, below. | ||
| Connections that appear in the signal flow diagram are shown in full color. | Source and destination parameters. Connection speed is shown for drive.web connections over Ethernet. | Please see Connection Contextual Menu, below. | |||
| Function block symbol shown in low color is active in the function block engine but is not placed in the signal flow diagram. | Function block name | Drag and drop into the signal flow diagram to replace it into the graphic. | Please see Function Block Contextual Menu, below. | ||
| Connection symbol shown in low color is active but is not placed in the signal flow diagram. | Same as connections, above. | Drag and drop into the signal flow diagram to replace it into the graphic. | Please see Connection Contextual Menu, below. |
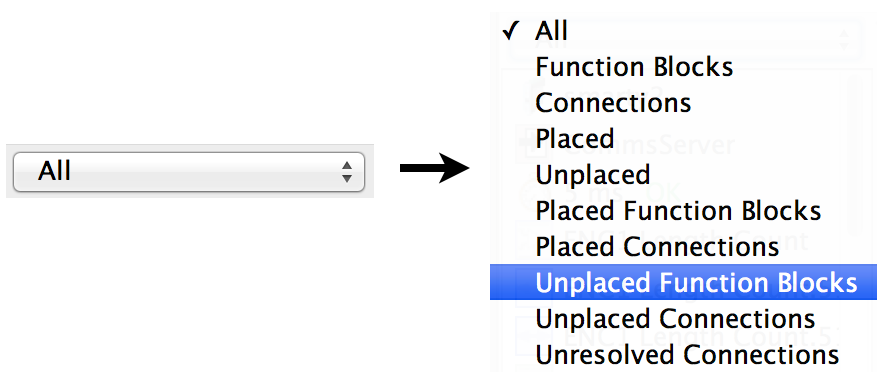 |
Find the function block and connection filter at the top of the function block and connection listing.
This filter may be useful for finding all function blocks that are not placed in the SFD graphic. |
Function blocks are executed in order from top to bottom in the listing. Drag and drop function blocks up or down the list to change the execution order.
Important Note! Drive-dedicated devices have a moveable horizontal divider separating native drive function blocks and connections into a second listing below the function block and connection listing.
| Find the SFD page selector underneath the function block and connection listing.
Use page selector arrows or enter specific page number. |
Signal Flow Diagram may contain many pages.
 |
Drawing border includes locating marks and a title block on each page.
See the SFD menu, below, for setup information. |
Click a function block for the Function Block View. View the internal structure, check or set parameter values and make connections.
Click and drag a function block or connection to move its placement in the signal flow diagram.
- The drawing edges are bordered in red and arrow icons are shown in each corner as a function block is dragged.
Drag the function block to the border to nudge the view in that direction.
The top corners drag the function block onto the previous page (top-left icon) and next page (top-right icon).
The icons at the bottom two corners promote dragging a function block onto the first page (bottom-left icon) and last page (bottom-right icon).
Productivity Tip Hold the Alt
key and drag and drop a function block to create another instance of this function block type when multiple instances are possible.
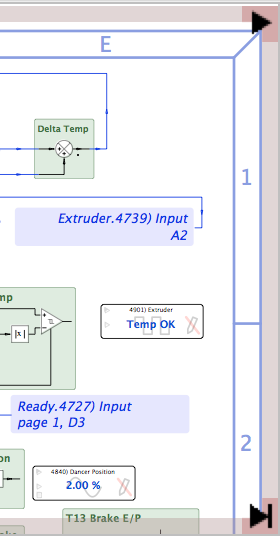
The signal flow diagram conveys useful information. Features are described here as they appear clockwise around this detail:
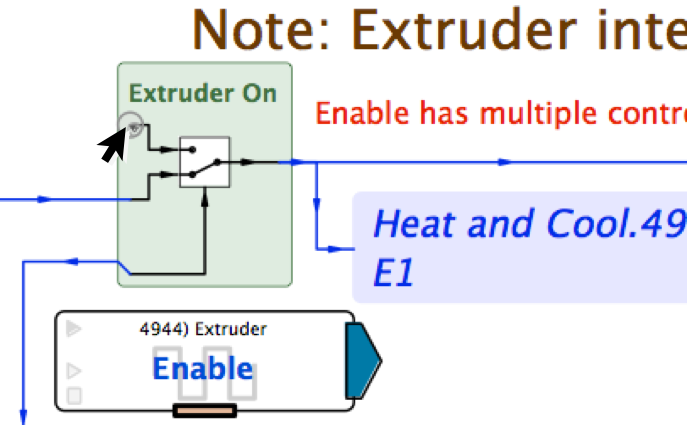 |
The mouse hovers over a parameter handle at upper-left. This active area promotes the parameter contextual menu and drag-and-drop connections. |
| The 2-Input Switch function block has been renamed, Extruder On. | |
| Two notes are displayed with different colors and sizes.
See SFD contextual menu below. | |
| There are two connections displayed from the function block output.
Connection direction arrows are shown according to savvy Preferences. The first connection may traverse to another parameter on this page. The second connection is split and the destination parameter's name, address and location are shown. Additional connections may exist that have been removed from the graphic to simplify the drawing. See connection contextual menu, below. | |
| The Extruder Enable parameter has been copied into the SFD to display live data there.
See parameter contextual menu, below. | |
| Parameters that are settable and act as a function block input may support outgoing connections. Note the small offset at this type of connection source, at bottom-left. | |
| There is an incoming connection at center-left. | |
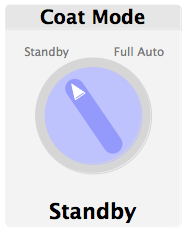
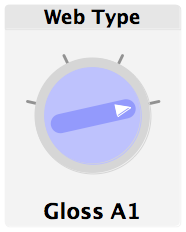
| The 2-Input Switch graphic is live. The switch arm shows the current state. |
Right-click in an empty area of the drawing for the SFD contextual menu.
- Start Zoom Marquee
Drag a rectangle and click to define a zoom area.
See Zooming below for more ways to zoom.
Add Note...
- Provides a dialog for composing the note and setting the font details.
Paste Parameter
- Places a copy of the active parameter box that is found inside a function block.
Add Function Block...
- Provides a dialog window that includes function block previews.
Use this choice in the unusual case that you need to define the first sequential parameter number in the function block.
Arithmetic etc.
A new instance of a selected function block is created at the right-click location.
Function block availability depends on the installed options.
SFD menu provides:
- Set Border...
- Standard borders are available in several form factors. Custom borders are available via business arrangement. Contact us for details.
Adjust the border size and origin.
Adjust the size of function block labels and connection splits.
Set User Attributes...
- Sets information in the drawing title block.
Set Timebase...
- The time in ms in which the entire function block engine completes one execution cycle.
See the System Function Block to view live execution time data and more.
The default timebase is 5ms for second generation drive.web devices, dw2xx.
Show Program...
- List with line numbers of function blocks and connections in the order that they are processed.
Change execution order by dragging function block up or down the function block listing.
Add Function Block...
- The designer is prompted to use right-click in the drawing to create new function blocks.
Clear...
- See the Clear dialog above.
Load Default Graphics...
- Shows the Clear dialog window. Loading default graphics requires clearing all existing graphics including savvyPanel.
Use with caution, clearing can not be undone.
- Standard borders are available in several form factors. Custom borders are available via business arrangement. Contact us for details.
savvyPanel is the operator touch interface.
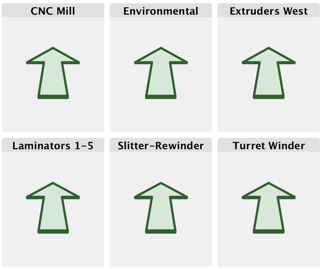
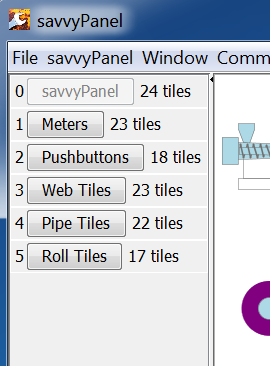
The savvyPanel Systems Page is the default, initial view when more than one savvyPanel system is available.
- savvy Preferences may define the initial view to be other than the savvyPanel System Page.
A drive.web device contributes savvyPanel tiles to only one savvyPanel system.
- Use the Device Contextual Menu to set the savvyPanel system for that device.
A savvyPanel system may consist of tiles from many drive.web devices.
A savvyPanel password set in a drive.web device may prevent all contribution from that device. Please see the Access Control user manual page for more information.
Click a tile to view that savvyPanel system's Home page.
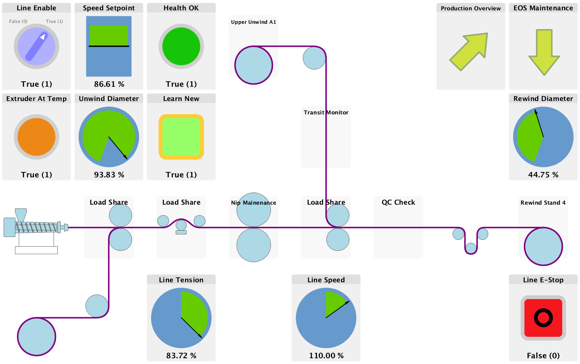
savvyPanel pages consist of an array or up to 16 x 16 tiles. savvyPanel tiles have a fixed aspect-ratio.
There are several tile types:
-
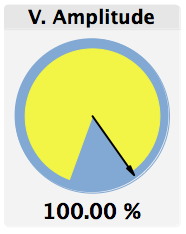
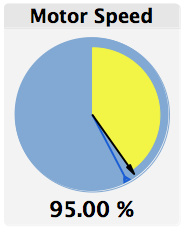
Meter for monitoring and setting. - Meters may also be bipolar, bar or digital-panel types.
Touch for setter dialog.
Dual meter shows setpoint and feedback. 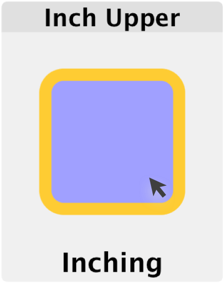
Momentary pushbutton. - The yellow border is shown while the button is actuated.
Start and Stop pushbuttons are lit when actuated. Use with savvyPanel function blocks, Latch and SR Latch.
Two position switch. - Touch the blue switch area to toggle.
Multi-position switch - The number of switch positions is equal to the number of enumerations defined for that parameter. Add or remove enumerations by using the Parameter Contextual Menu

Indicator is available in a variety of colors. 
Alarm indicator - Produces a single audible alarm when it is actuated.
The yellow border indicates that the alarm has not been acknowledged. Touch the indicator to acknowledge.
Graphic tiles are for illustrative purposes. 
Page-link Touch to view the named page. - Page-link graphic may be the same as any graphic tile.
- Meters may also be bipolar, bar or digital-panel types.
Touch a settable tile for a savvyPanel setter.
-
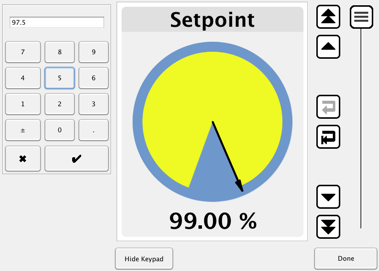
Analog setter shown is typical for Java-based platforms. savvyPanel for iOS provides a choice of slider or click-wheel setters.
Slider includes buttons for revert-to-last, return-to-default, increment / decrement first and second least significant digit.
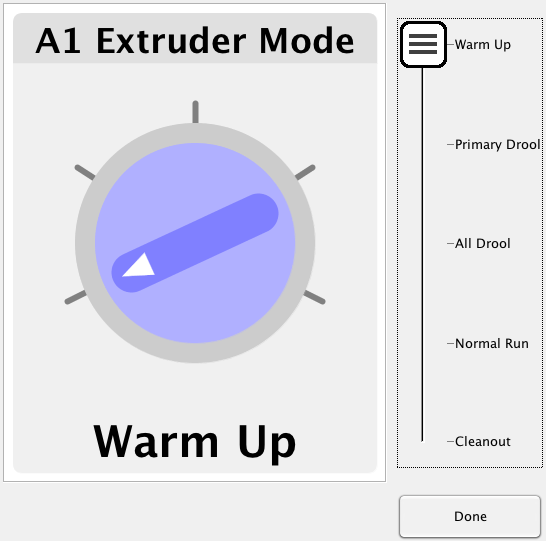
Multi-position switch setter.
A Home or Systems Button is always visible in savvyPanel.
-

Home Button is a link from any Operator Page to the Home Page of that System. 
Systems Button links to the systems page from a home page. It is the only way for an operator to navigate back to the systems page. 
Systems Button icon in savvyPanel for iOS.
The Systems Button is inactive when there is only one savvyPanel system available.
The Home and Systems Button is locked with the home password. See Home Password on the Access Control page.
Building or Altering a savvyPanel Design
savvy-SFD and Engineer or Administrate capability is required to build or alter a savvyPanel design.
Add savvyPanel tiles.
-
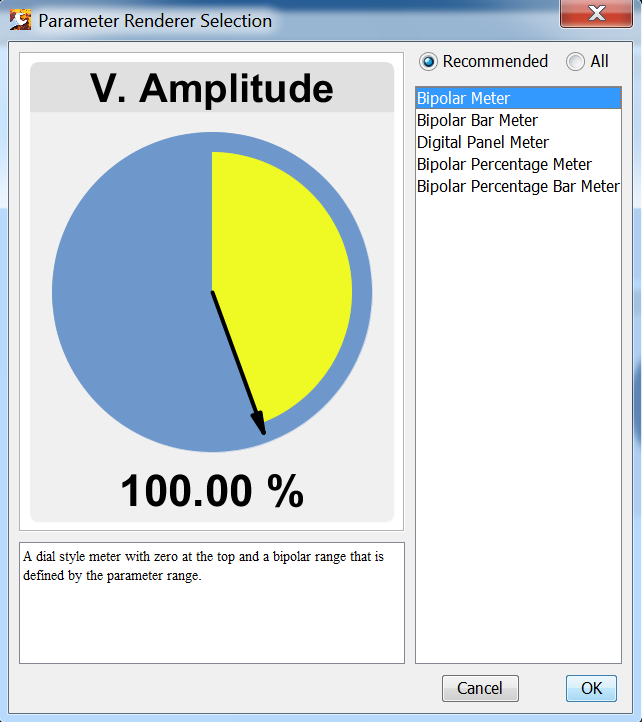
A tile chooser with recommendations, descriptions and live previews is provided. Add tiles that are associated with function block engine parameters.
- Use the parameter's contextual menu to copy it. This is typically done in the SFD or function block view although parameters can be copied from a dock or savvyPanel page, too.
Paste with the savvyPanel contextual menu. See below.
Alternatively, drag a parameter from another viewer window and drop it into a savvyPanel page.
Graphic and page-link tiles are added via the savvyPanel contextual menu. See below.
- Use the parameter's contextual menu to copy it. This is typically done in the SFD or function block view although parameters can be copied from a dock or savvyPanel page, too.
A savvyPanel page listing is provided when the capability for building and altering savvyPanel designs is present.
-
Click a page-button to view that page. Right-click a page-button to change or delete a page name.
- Important note - Choose the drive.web device to store the page name in when changing the page name. That drive.web device must be available to display the page name.
Click and drag a tile to move it. The drawing edges are bordered in red to allow the tile to be dragged outside of the current view.
Right-click in an open area of the savvyPanel page for the savvyPanel contextual menu.
Start Zoom Marquee
- Please see Zooming and Navigating, below.
Paste Parameter
- Creates a new parameter tile. Parameters may be copied from any view. Please see Parameter contextual menu, below.
Create Graphic and Page-Link tiles.
- Important note - Choose a drive.web device at the bottom of the dialog window to store the graphic or page-link tile in. That drive.web device must be available to display the tile.
savvyPanel menu provides:
-
Home View
- Equivalent to the Home and Systems Button described above.
Operators must enter the Home Password when it is set.
Add, Delete or Clear savvyPanel Passwords
- savvyPanel Password must be added to view a drive.web device's savvyPanel tiles when that device has a password set.
See savvyPanel Password on the Access Control page for details.
Set Password for Home
- Home Password restricts access to the Home Page and / or Systems Page.
See savvyPanel Home Password on the Access Control page for details.
Size for iPad (Portrait) etc.
- Designers and Operators can size the window to match Apple�� mobile digital devices' screens.
- Equivalent to the Home and Systems Button described above.
Dock view has two primary modes.
In the default view, the dock is a live, interactive display of selected parameters in an array.
See the dock menu below to switch dock views.
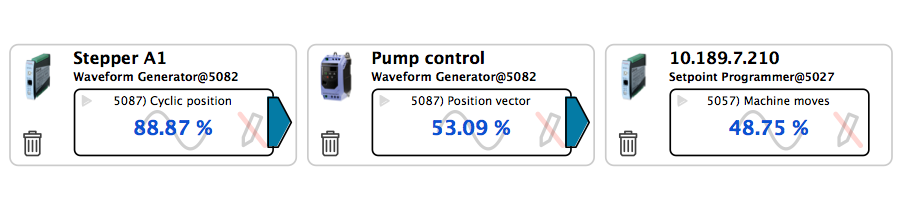
- Click the active data area in settable parameters for the Parameter Setter.
Click and drag the active data area to move the parameter's position in the dock.
Click the trash can icon to remove a parameter from the dock.
Right-click for the Parameter Contextual Menu.
A live parameter-trending view is available for the first six parameters that are added to a dock.
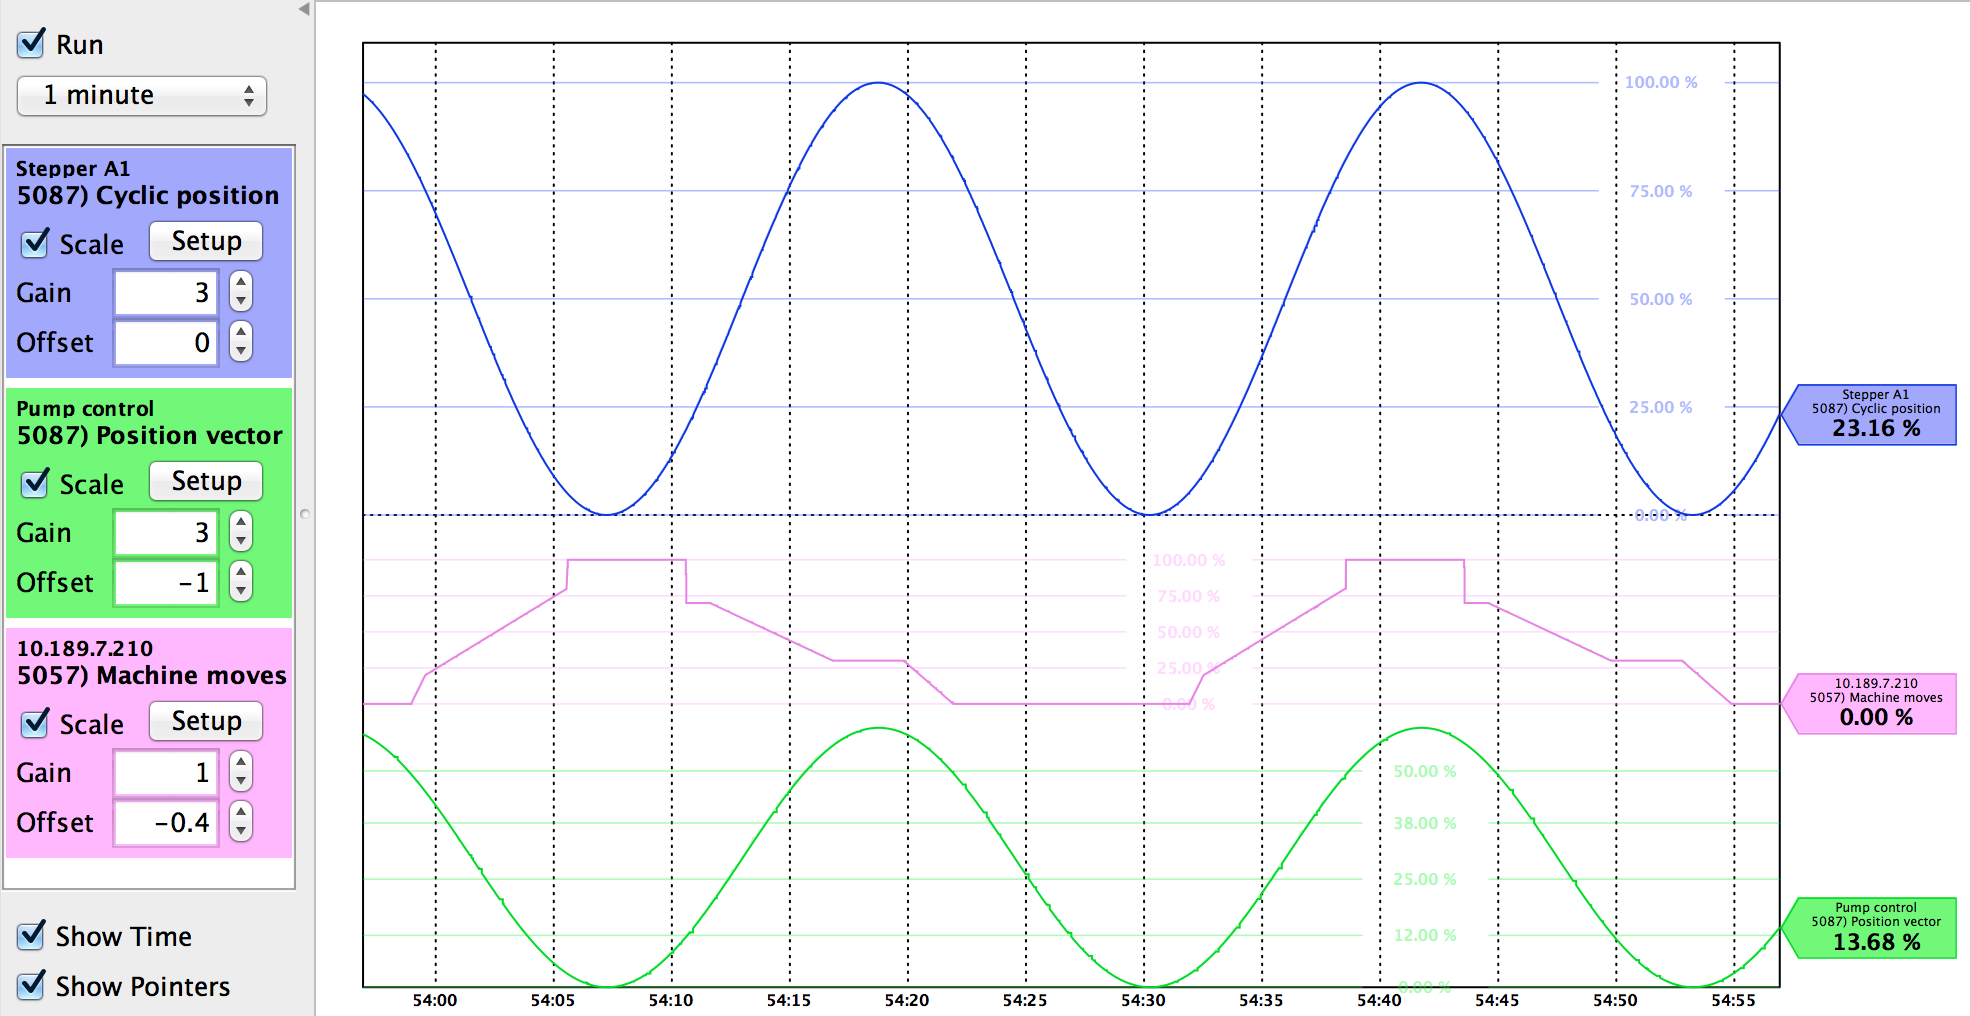
- Trend view controls -
-
Run checkbox Uncheck to pause the trend. Data continues to be captured off screen. 
Choose trend timespan from 10 seconds to 2 days. 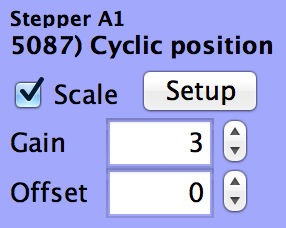
Trend parameter control panel. Scale checkbox enables the colored, horizontal lines of the vertical scales.
Setup button provides a dialog to specify the horizontal scales.
Gain scales the trend. The data and horizontal scale is multiplied by this value.
Offset is applied to the scaled trend. Offset of 1 is typically the full scale.
Show Time checkbox Enables the time labels. The vertical scale lines are not affected. Show Pointers checkbox Enables the colored pointers at the right side which display the instantaneous value.
Trend data is updated according to the Marshaled Polling Period setting found in the savvy Preferences. The range is 20ms to 500ms. A shorter period gives a smoother trend but increases the network loading.
Trend data updates may also be limited by the host computer's network interface and network loading.
Each parameter trend may store up to 2700 data points.
Static data values are not gratuitously stored so longer trend periods may be obtained for those parameters.
Save parameter docks on the host computer for later use. Use Save As... under the File menu to create a .dw-dock file.
-
Right-click in the trend area for a contextual menu.
- Start Zoom Marquee
Please see Zooming and Navigating, below.
Paste Parameter
- Paste additional parameters directly into the trend.
Parameters may be copied from any view.
Please see Parameter contextual menu, below.
Show Trend Point Info
- The info window shows the computer timestamp including milliseconds and each parameter value at that trend point.
Dock menu provides:
-
- Show Trend / Parameters
Switches the dock viewing mode. The parameter mode promotes setting settable parameters and removing parameters from the dock.
- Export Raw Data to CSV File
Produces a .csv file suitable for Microsoft Excel spreadsheets, etc with every data point in the trend.
- Export Sampled Data to CSV File
Similar to previous but with controls for Sample Period, from 100ms to 1 minute and Export Size, from 1 minute to 2 hours.
Connections View
Use Open Connections List in the File Menu to view all drive.web connections in the directory but not the local connections within devices.
Use the Device Contextual Menu to view only the connections within that device.
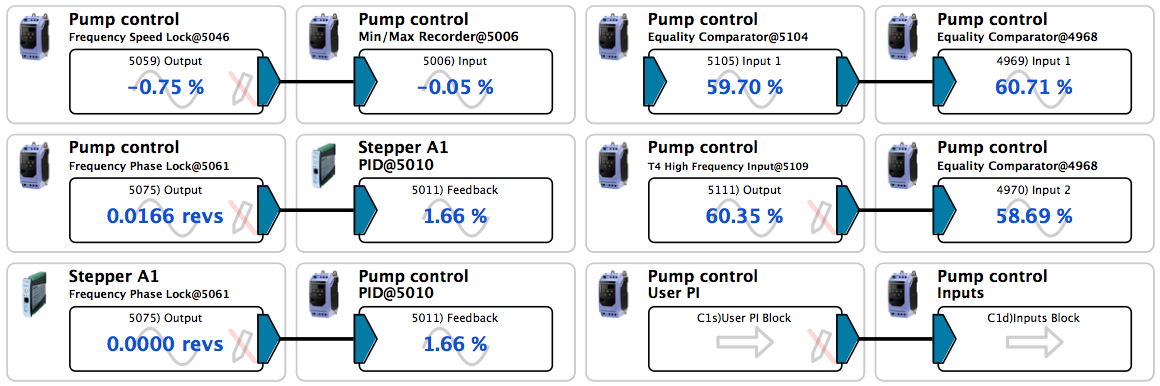
Pairs of connected parameters are shown in an array. The connection source is to the left and the destination is to the right.
Parameter data is live.
Click the blue connection arrow for the Function Block View at the other end of the connection.
Right-click the blue connection arrow for the Connection Contextual Menu.
Click the device icon to view its Signal Flow Diagram or Function Block Engine.
Right-click the device icon for the Device Contextual Menu.
Connections menu provides sorting choices. Sorting placement is left-to-right then top-to-bottom.
Some important views do not have a dedicated menu.
Device Overview is particularly useful for drive-dedicated devices.
This is the initial view when a device is clicked in the free version of savvy.
Click the device icon in the SFD view to view the device overview.
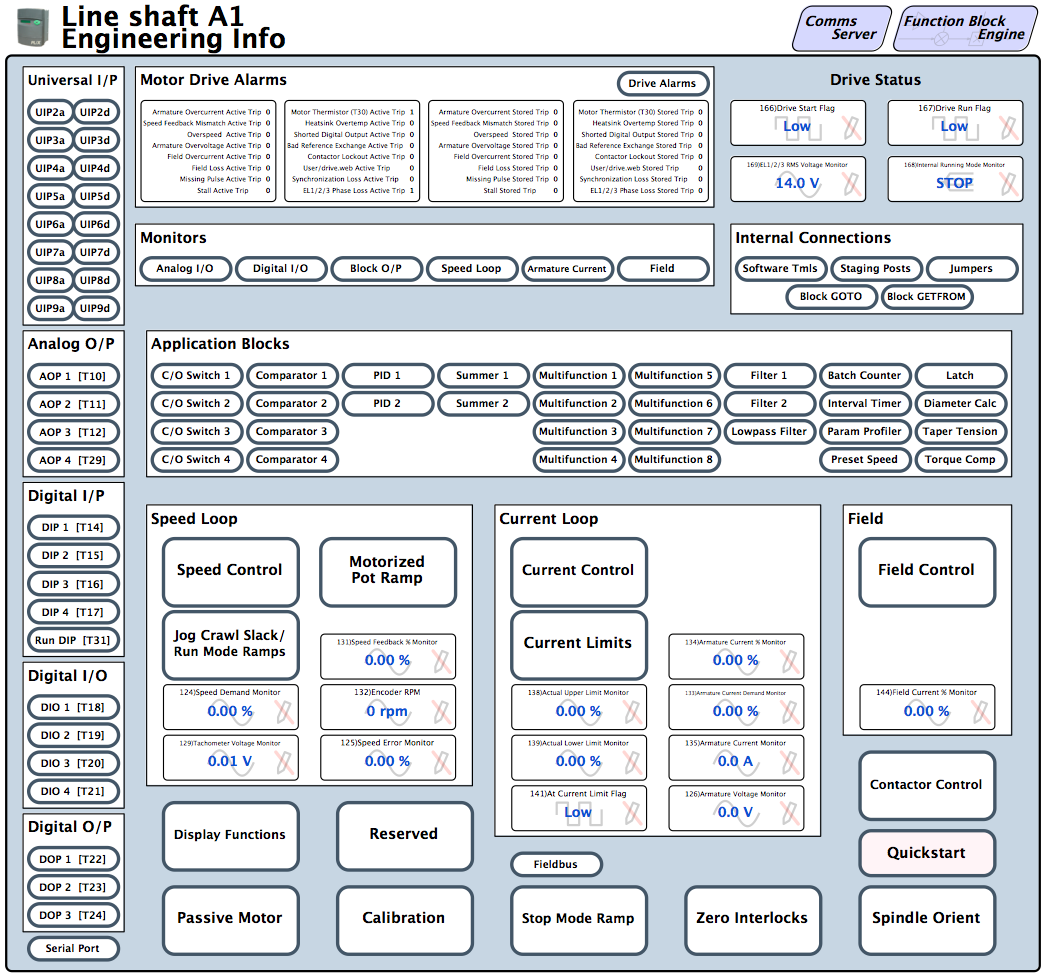
The PL-Series DC Drive overview screen includes live diagnostic parameters and buttons to view the drive's native function blocks.
Find links to the host drive.web device's Function Block Engine and Comms Server setup page, when present, at top, right.
Function Block view shows live parameters and the function block's signal flow diagram.
Click function blocks in the SFD or FBE view for this view.
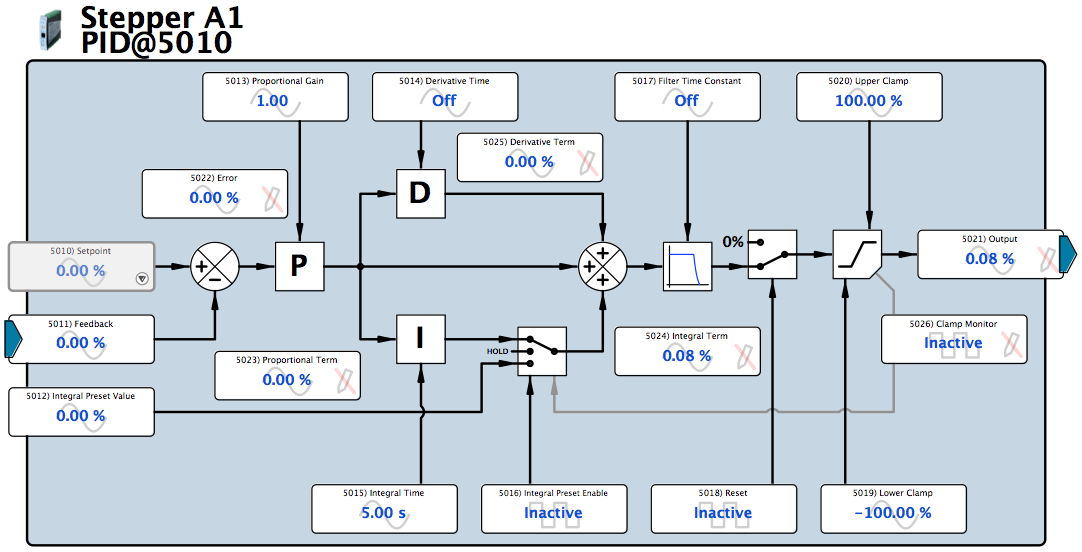
Switch position moves in the graphic to show actual, current state.
Click parameters that do not have an incoming connection and are not read-only for a parameter setter.
Right-click parameters for the parameter contextual menu.
Comms Servers view, with available options
The presence of available options is indicated. The view is not available when no options are present.
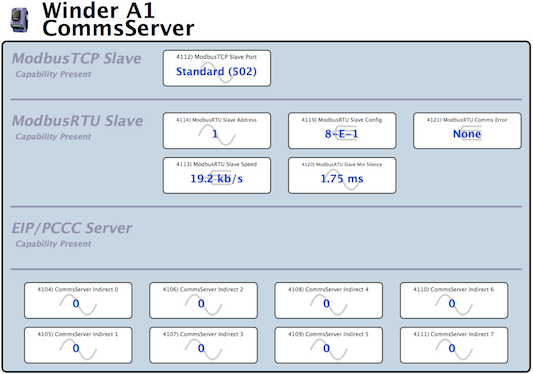
ModbusTCP Ethernet Server, dwOption-04
- ModbusTCP Slave Port 502 is standard and specified in the protocol. Change to match the master in the unusual case that it is not standard.
EIP/PCCC Ethernet Server, dwOption-25
ModbusRTU Server model dependent, check operation guides.
- Set address, baud rate, character framing and silence time. View the current error status. Connect from the error parameter to log or manage comms problems.
Comms Server Indirect parameters
- Available with all server options. Parameters are sequentially numbered to support marshalled polling. The parameters hold the addresses of other parameters in the device configuration so that the data is conveyed to and from the target parameter.
Zooming, Panning and Other Navigation Tools
When a page is first opened it is automatically zoomed and panned to fit completely in the current window. This is called the Home view.
- Press the
h
key on the keyboard or the5
key on a numeric keypad for the Home view.Alternatively, use the Window menu > View > Home to view.
Get smaller or larger zoom and pan steps, discussed below. Hold the Shift
key for less and Alt
for more zoom or pan.
Zoom
Use the mouse scrollwheel to zoom or pan. Choose the scrollwheel action in the savvy Preferences.
- Another preference causes zoom to center on the mouse's current location.
Use the +
and -
keys on the keyboard to zoom in and out.
Zoom at the current cursor location by pressing the c
or F1
key.
- Zoom out from the current location with the
x
key.
Hold Control
and Alt
keys together and move the mouse horizontally. Move left to zoom in, right to zoom out.
Zoom to a marquee:
- Hold
Shift
key, click and drag a window to zoom.Right-click, choose Start Zoom Marquee then move to define a zoom marquee. Click to zoom. Escape to cancel.
Pan
Hold the Alt
key on the keyboard and move the mouse to pan.
Use the arrow keys on the keyboard
Use a numeric keypad to pan in eight directions, centered on 5
, Home view.
Use the A, S, W and D keys to pan in four directions.
Use the B, N, M, J, U. Y, T, G keys to pan in eight directions. Centers on h
, Home view.
Browsing
Click the browsing arrows in the status bar to change views
A view history is maintained.
- Click the left arrow for the previous view.
Click the right arrow for the next view in the history.
Click the up arrow for the logical parent view. In the picture above the directory view is the parent so the up arrow is unavailable.
Multiple savvy viewer windows promote convenience and ease configuration
savvy supports multiple viewer windows rooted in a common device directory.
- A drive.web device must be discovered in the directory to contribute to any other viewer window.
Choose Open Device Directory under the File menu to view the current directory population.
Choose New Viewer... under the File menu to create a new, empty window.
Docks may be designed and saved on the host computer for many specific tasks.
- To start building a new dock with another dock already open, create a new, empty viewer window. Now choose Add to Parameter Dock from a parameter contextual menu and choose the new empty viewer window to start the new dock. Alternatively drag and drop the parameter into the empty viewer.
To open a previously saved dock, choose Open Dock File... under the File menu.
Drag and drop items from one window into another to expedite tasks.
- Create new connections. Drag a parameter onto another parameter in the same device or in a separate drive.web device connected by Ethernet to create a new connection. The dragged parameter is the connection source. The destination parameter must be able to accept incoming connections. See the parameter contextual menu.
Drag a function block from one SFD page to another in the same device to move the function block to that page. Hold the
Alt
to create a new instance of the function block.Drag a parameter onto an SFD page to copy and paste it there.
Drag a parameter into a dock to add it there.
Drag a parameter into a savvyPanel page to copy and paste it there.
Drag a savvyPanel tile from one savvyPanel page to another within the same savvyPanel system to move it there.
drive.web technology supports multiple users
All the configuration information, connections, SFD, savvyPanel data is stored in the drive.web devices and may be conveyed to many computing devices simultaneously.
- A computer running savvy software or Apple mobile device running savvyPanel only needs to access the device(s). See the Access Control user manual page for more information.
Changes made by one user are immediately visible to other users.
Active objects, adornments and contextual menus
Devices, function blocks, parameters and connections are active objects in any savvy view. savvyPanel views are not discussed here as they are designed for simple touch interface.
Active objects may be displayed with adornments which convey contextual information.
Hover the mouse over an active object.
- View key data in the status bar.
Reveal the object's hover button. Click to access its contextual menu.
Click an active object.
- Click a device to view page one of its SFD or the FBE view in the free version of savvy.
Click a function block for that function block view.
Click a settable parameter for a setter. A parameter is settable if it does not have an incoming connection and is not read-only.
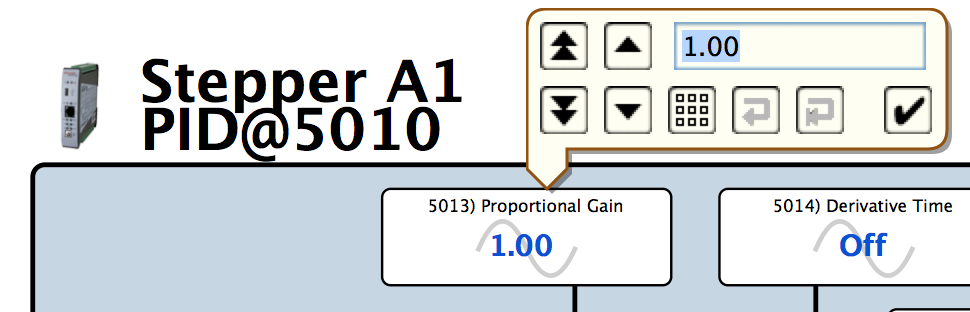
- Enter values directly with the keyboard or -
Increment or decrement least or second-least significant digit or -
Get a touch-compatible keypad or -
Return to default value or -
Revert to previous setting.
Click a connection to view the other end.
- Enter values directly with the keyboard or -
Right-click an active object (or click its hover button) for its contextual menu.
- Contextual menus change according to the context in which they are invoked. The descriptions below are general and may differ in particular contexts.
Device Adornments and Contextual Menu
Device icon adornments are described here as they appear clockwise around this detail, from top-left:
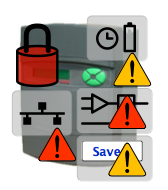 |
Device is locked. See the Access Control user manual page for more information. |
| savvy has detected a large differential between the device realtime clock setting and the host computer's. This generally indicates that the realtime clock battery is discharged.
Only drive.web smarty devices feature a realtime clock. smarty models, dw21x, feature a rechargeable battery. This battery requires up to several days for a full charge. A full charge may maintain the smarty dw21x realtime clock for up to several months while the device is not powered. | |
| The device is not processing its function block engine due to an error.
This is most likely a result of importing a device configuration which contains a function block that is not supported by the device's firmware version or option capabilities. Use Program Line Number in the System Function Block and Show Program under the SFD or FBE menu to find the unsupported function block. | |
| Unsaved changes in a PL-series DC drive. Use the Device Contextual Menu to save. | |
| The comms interface has failed. savvy is not communicating with this device via the interface (Ethernet, USB or serial) on which it was discovered. |
Get Info
View name, interface type, group, type, versions, addresses and network setup information.
Get Detailed Info
- Same info as above plus:
- User Info; savvyPanel system name and password presence.
FBE Resource Info; storage and capacity usage details.
Capability Information; Function block, Hardware and Firmware capabilities available in this device.
Miscellaneous includes last update info of the device real-time clock.
Incoming and outgoing connection details.
- User Info; savvyPanel system name and password presence.
Find Parameter...
- Enter parameter number, name or partial name to view that parameter.
Show Connections...
- View all connections associated with this device. See Connections View, above.
Lock, Set Password and Clear Password
- Please refer to the Access Control user manual page.
Change Name...
- The device name is shown in most views instead of the device address.
Set Group...
- Groups are used for sorting in the Device Directory and for filtering device discovery.
Set savvyPanel System and Password
- Please see the savvyPanel section, above.
Import Device Data...
- Opens a selection dialog and all configuration and connection information may be overwritten.
Export Device Data...
- Opens a selection dialog to create a .dw-system file on the host computer that contains all configuration and connection information for that device.
Export to Text File >
- Various text exports are available. Use PLX Menu List only with PL-series DC drives. Contact us for information on using custom templates.
Show Log...
- Produce a current copy of the device log in the Info Window.
Clone to New Phantom...
- A dialog requests an IP address at which to create a new phantom in the directory with the same capabilities and configuration.
Clear...
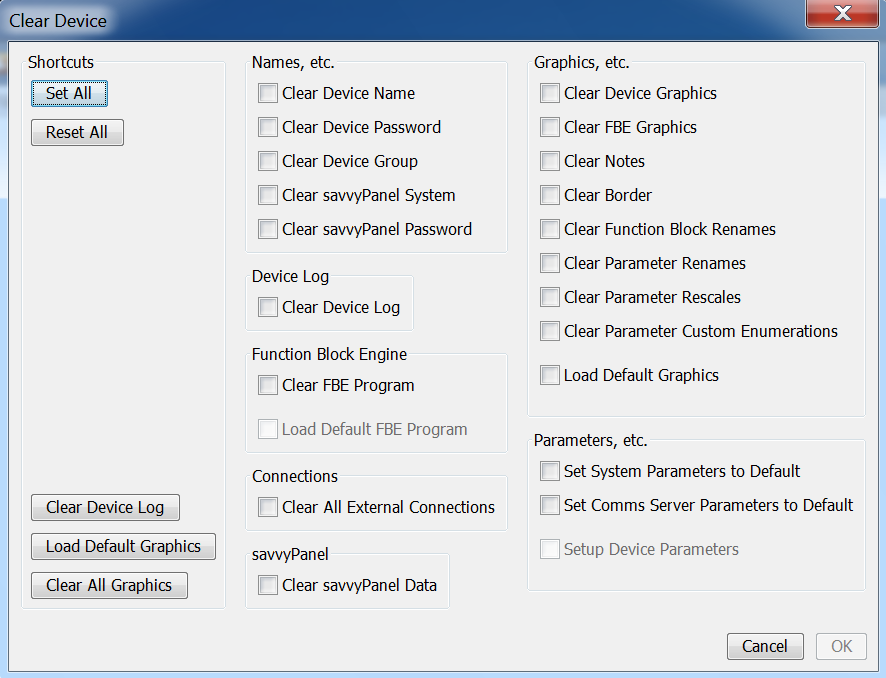
Note! Clearing a device can not be undone. Export the device configuration first if you have any doubts.
Select Set All to return a device to default configuration.
The Clear dialog does not affect the network settings, IP addresses etc. Contact us for information on resetting device networks settings.
Set Clock
- Sets the real time clock in the drive.web device to the host computer's time.
A savvy preference Threshold for automatic adjustment of device clock causes the real time clock to be checked and set every time the device is discovered.
Upgrade Device...
- Please see the upgrades paragraph on the Getting started with savvy guide for details.
Load Firmware...
Download the latest firmware from the get savvy page at www.driveweb.com.
Delete
- Remove this device from the device directory. Note that Ethernet-discovered devices will re-appear in the directory if automatic discovery is enabled. Please see the device discovery section, above.
Function Block Adornments and Contextual Menu
Function block adornments are displayed in the SFD and Function Block views.
 |
Optidrive-P2 Control function block features a special adornment when savvy detects that the drive is not setup properly for drive.web control. Check the device product manual for details. |
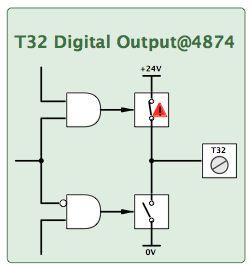 |
smarty model dw21x digital output Fault Status is Faulted. The smarty measures low Voltage at the terminal when the logic is high and the source is enabled. Check the device product manual for details. |
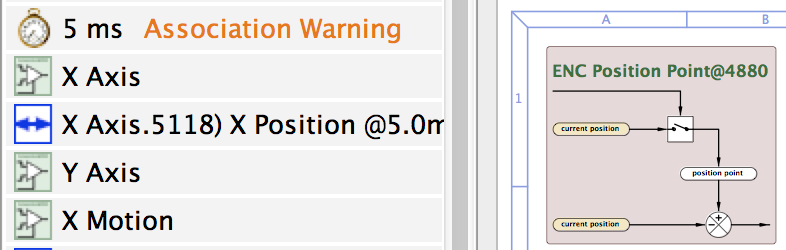 |
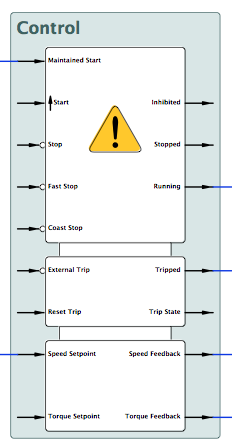
Certain function blocks must be associated with another in order to function.
The function block is displayed in red and is non-functional. The system status is Association Warning. Click on the function block and select the parameter that indicates None (Disabled) to make the required association. |
Get Info
- View function block information in web page format.
Change Name...
- The function block name is displayed in most views and references to its parameters.
Delete
- Delete this instance of this function block type along with its name, parameters and settings.
Parameter Adornments and Contextual Menu
Parameter adornments are described here as they appear clockwise around this detail, from top-left:
 |
The parameter name has been changed from default. |
| The parameter is a read-only type. | |
| The blue connection arrow at right indicates an outgoing connection.
This connection arrow is also an Active Object. | |
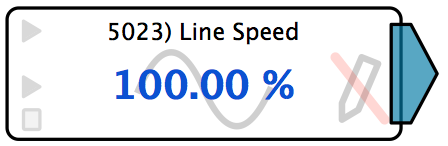
| The small, grey rectangle at bottom-left indicates the parameter is present in a savvyPanel page. | |
| The displayed parameter value is scaled differently than default. |
Get Info
- Displays important parameter information in the Info Window including ID number, scaling, default, minimum and maximum values.
Add to Parameter Dock
- Please see the Dock section, above.
Copy Parameter
- Use to paste a parameter into a SFD or savvyPanel page.
Connect to..., Make Connection from... Start Connection, Restart Connection
- The availability of these choices depends on whether the parameter can have incoming or outgoing connections. Use Get Info, above to find this information.
A parameter can only accept one incoming connection.
It is possible to make connections within the device and to and from ethernet-discovered devices.
Re-Name...
- The function block name is used in graphics and references.
Change Enumerations...
- Custom enumerations are possible with most parameters. The enumeration is displayed in graphics and references instead of the numerical value.
Re-Scale
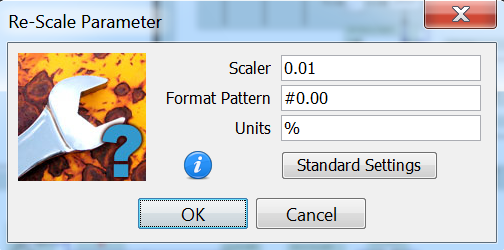
- A dialog window supports re-scaling how that parameter's data is displayed in savvy and savvyPanel. The raw data is unaffected.
The dialog also supports re-defining the format pattern, i.e. the number of decimal places shown.
The units displayed may also be defined here.
Click Standard Settings to return to original factory settings.
Switch Units
- Only for parameters that define rate changes such as acceleration and deceleration, switch between time(s) and rate(%/s).
Remove from Graphic
- Only found in SFD View. Reduce unnecessary graphic content by removing a function block from the SFD diagram. The function block is still active and the device function is unaffected. Please see the SFD view, function block and connection listing, above.
Connection Contextual Menu
Get Info
- Source and destination parameters are displayed in the Info Window
The connection sample period is shown for connections to other devices.
Change Sample Period...
- Only present for connections to other devices.
Enter the desired sample period in milliseconds.
Delete
- Permanently delete the connection.
Remove from Graphic
- Reduce unnecessary graphic content by removing a connection from the SFD diagram. The connection is still active and the device function is unaffected. Please see the SFD view, function block and connection listing, above.
Split, Un-Split
- Use to split connection lines on the page. A split box is provided at each end.
Hover over the connection split box to highlight it and its corresponding partner on the page. Also find information in the Window Status Bar.
Click a connection split box to view the other end.
Click and drag to move the split box.
Change the size of the split box with SFD Menu > Set Border...
Jump to Source / Destination Parameter
- A choice is provided to jump to the SFD View or the Function Block View that contains the source / destination.
- Source and destination parameters are displayed in the Info Window
Quitting or Exiting the software
Close all windows or choose Exit under the File menu. (Choose Quit in the savvy application menu for Mac OSX.)
Changes made to parameters, connections, SFD, savvyPanel and other configuration elements in drive.web devices are persistent and do not need to be saved explicitly.
See Device Directory and Device Contextual Menu to create a .dw-system file on the host computer for off-line reference and archiving.
Remember:
- Save any changes to open dock windows. Use the File menu for that window > Save / Save As..
Save parameters to EEPROM in PL-Series DC drives when changes have been made to drive parameters. This is a special menu item in that device's contextual menu.